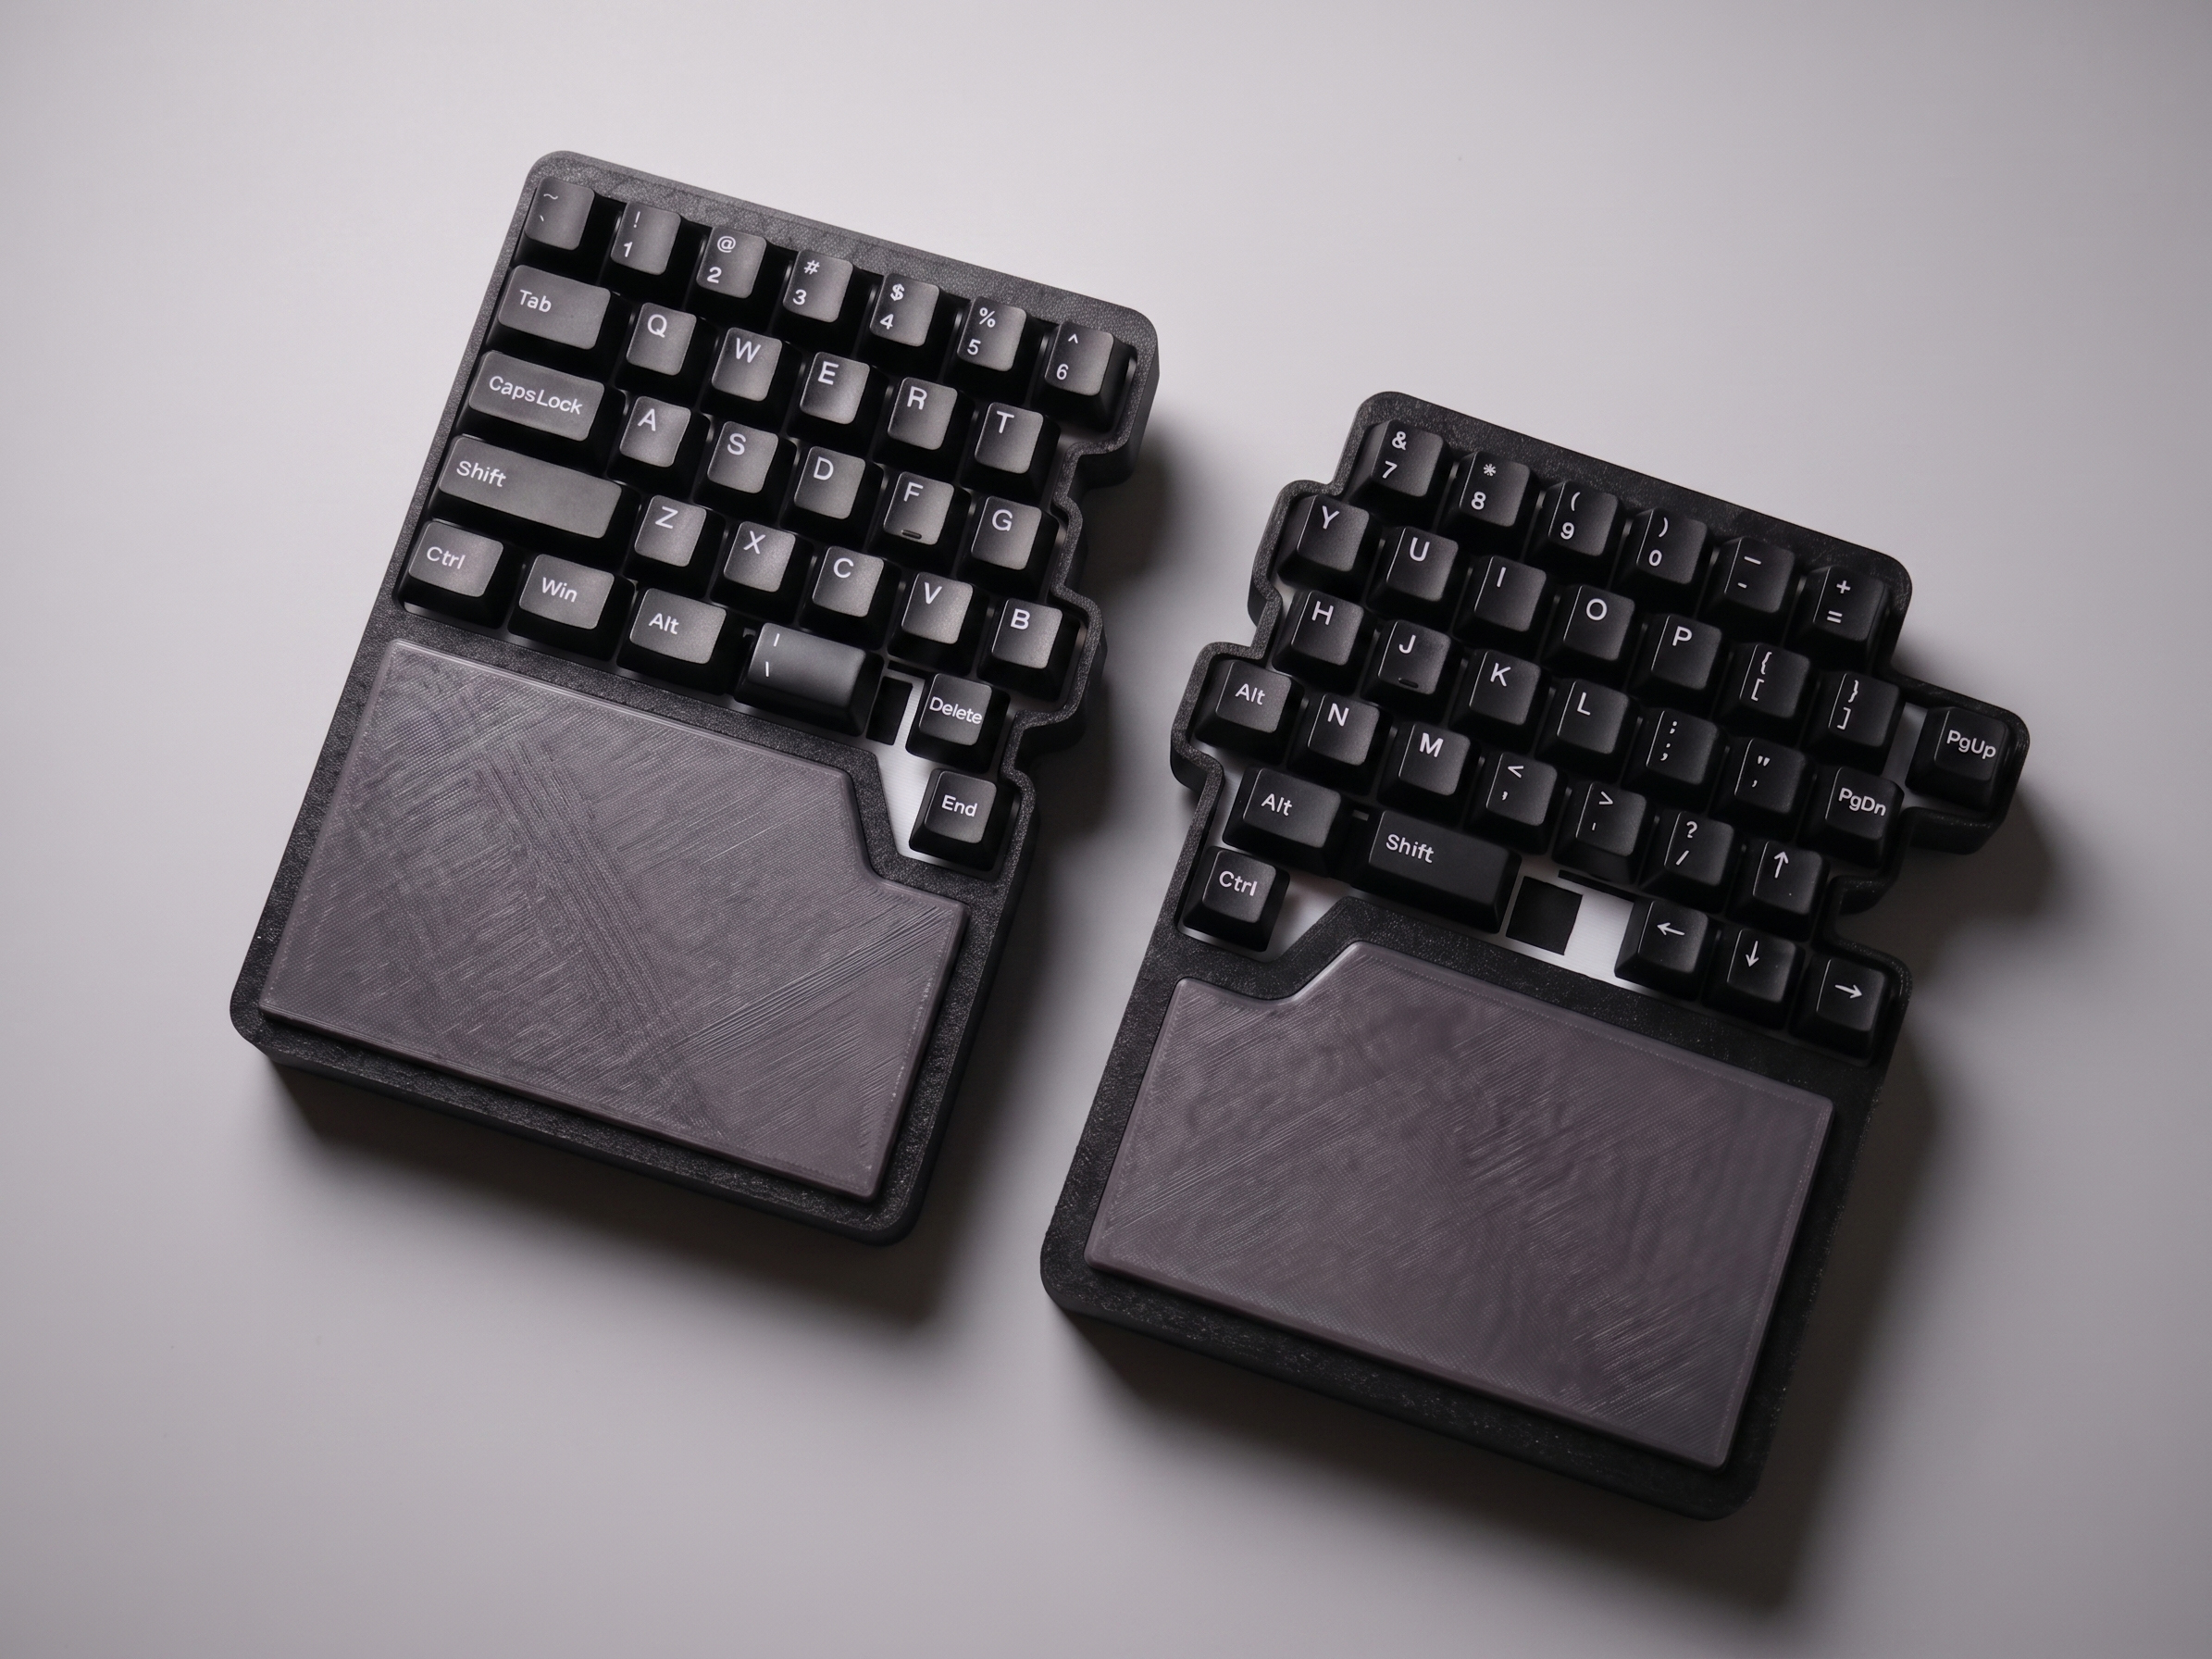
Matdol은 PCB와 펌웨어, 케이스를 한 사람이 직접 설계한 DIY 스플릿 키보드 프로젝트다. 손목을 덜 움직일 수 있는 스플릿 레이아웃은 유지하면서도, 기존에 사용하던 스플릿 키보드에서 아쉬웠던 키 배치와 수리성, 타건감을 직접 바꾸고 싶어 만들기 시작했다.
현재 V2 빌드에는 세라믹 키캡과 40g급 리니어 스위치, 가스켓 마운트와 포론 흡음재를 사용했다. 낮고 묵직한 thock에 세라믹 특유의 맑고 단단한 crack이 섞인 타건음을 목표로 했다.
이 글에서는 첫 번째 프로토타입의 실패가 Matdol V2의 설계로 이어진 과정과, 다음 단계인 5대 파일럿 제작에서 검증하려는 내용을 기록한다.
Matdol V2 한눈에 보기
| 항목 | 내용 |
|---|---|
| 레이아웃 | 왼쪽 31키, 오른쪽 34키의 비대칭 65키 스플릿 레이아웃 |
| 주요 특징 | 오른손 ㅠ 키, 중앙에 가까운 Backspace, 분리형 팜레스트 |
| 펌웨어 | ZMK 기반, ZMK Studio를 통한 키맵 수정 지원 |
| 컨트롤러 | 소켓 방식으로 교체 가능한 컨트롤러 모듈 |
| 상태 확인 | 외부 펌웨어 업데이트 버튼 및 상태 LED |
| 마운트 | 실리콘 가스켓으로 플레이트를 지지하는 가스켓 구조 |
| 케이스 | 3D 프린팅으로 제작한 상·하판 구조 |
| 현재 빌드 | Cerakey Matte Black 키캡, 40g급 리니어 스위치, 포론 흡음재 |
| 팜레스트 | TPU 3D 프린팅 |
Matdol이 탄생하기까지
손목 통증의 시작
장시간 키보드를 사용하며 업무를 하다 보니 오른쪽 손목이 아프기 시작했다. 내 경우에는 Backspace를 누를 때마다 오른손이 바깥쪽으로 크게 꺾였고, 이 동작을 반복하는 것이 통증을 키우는 듯했다.
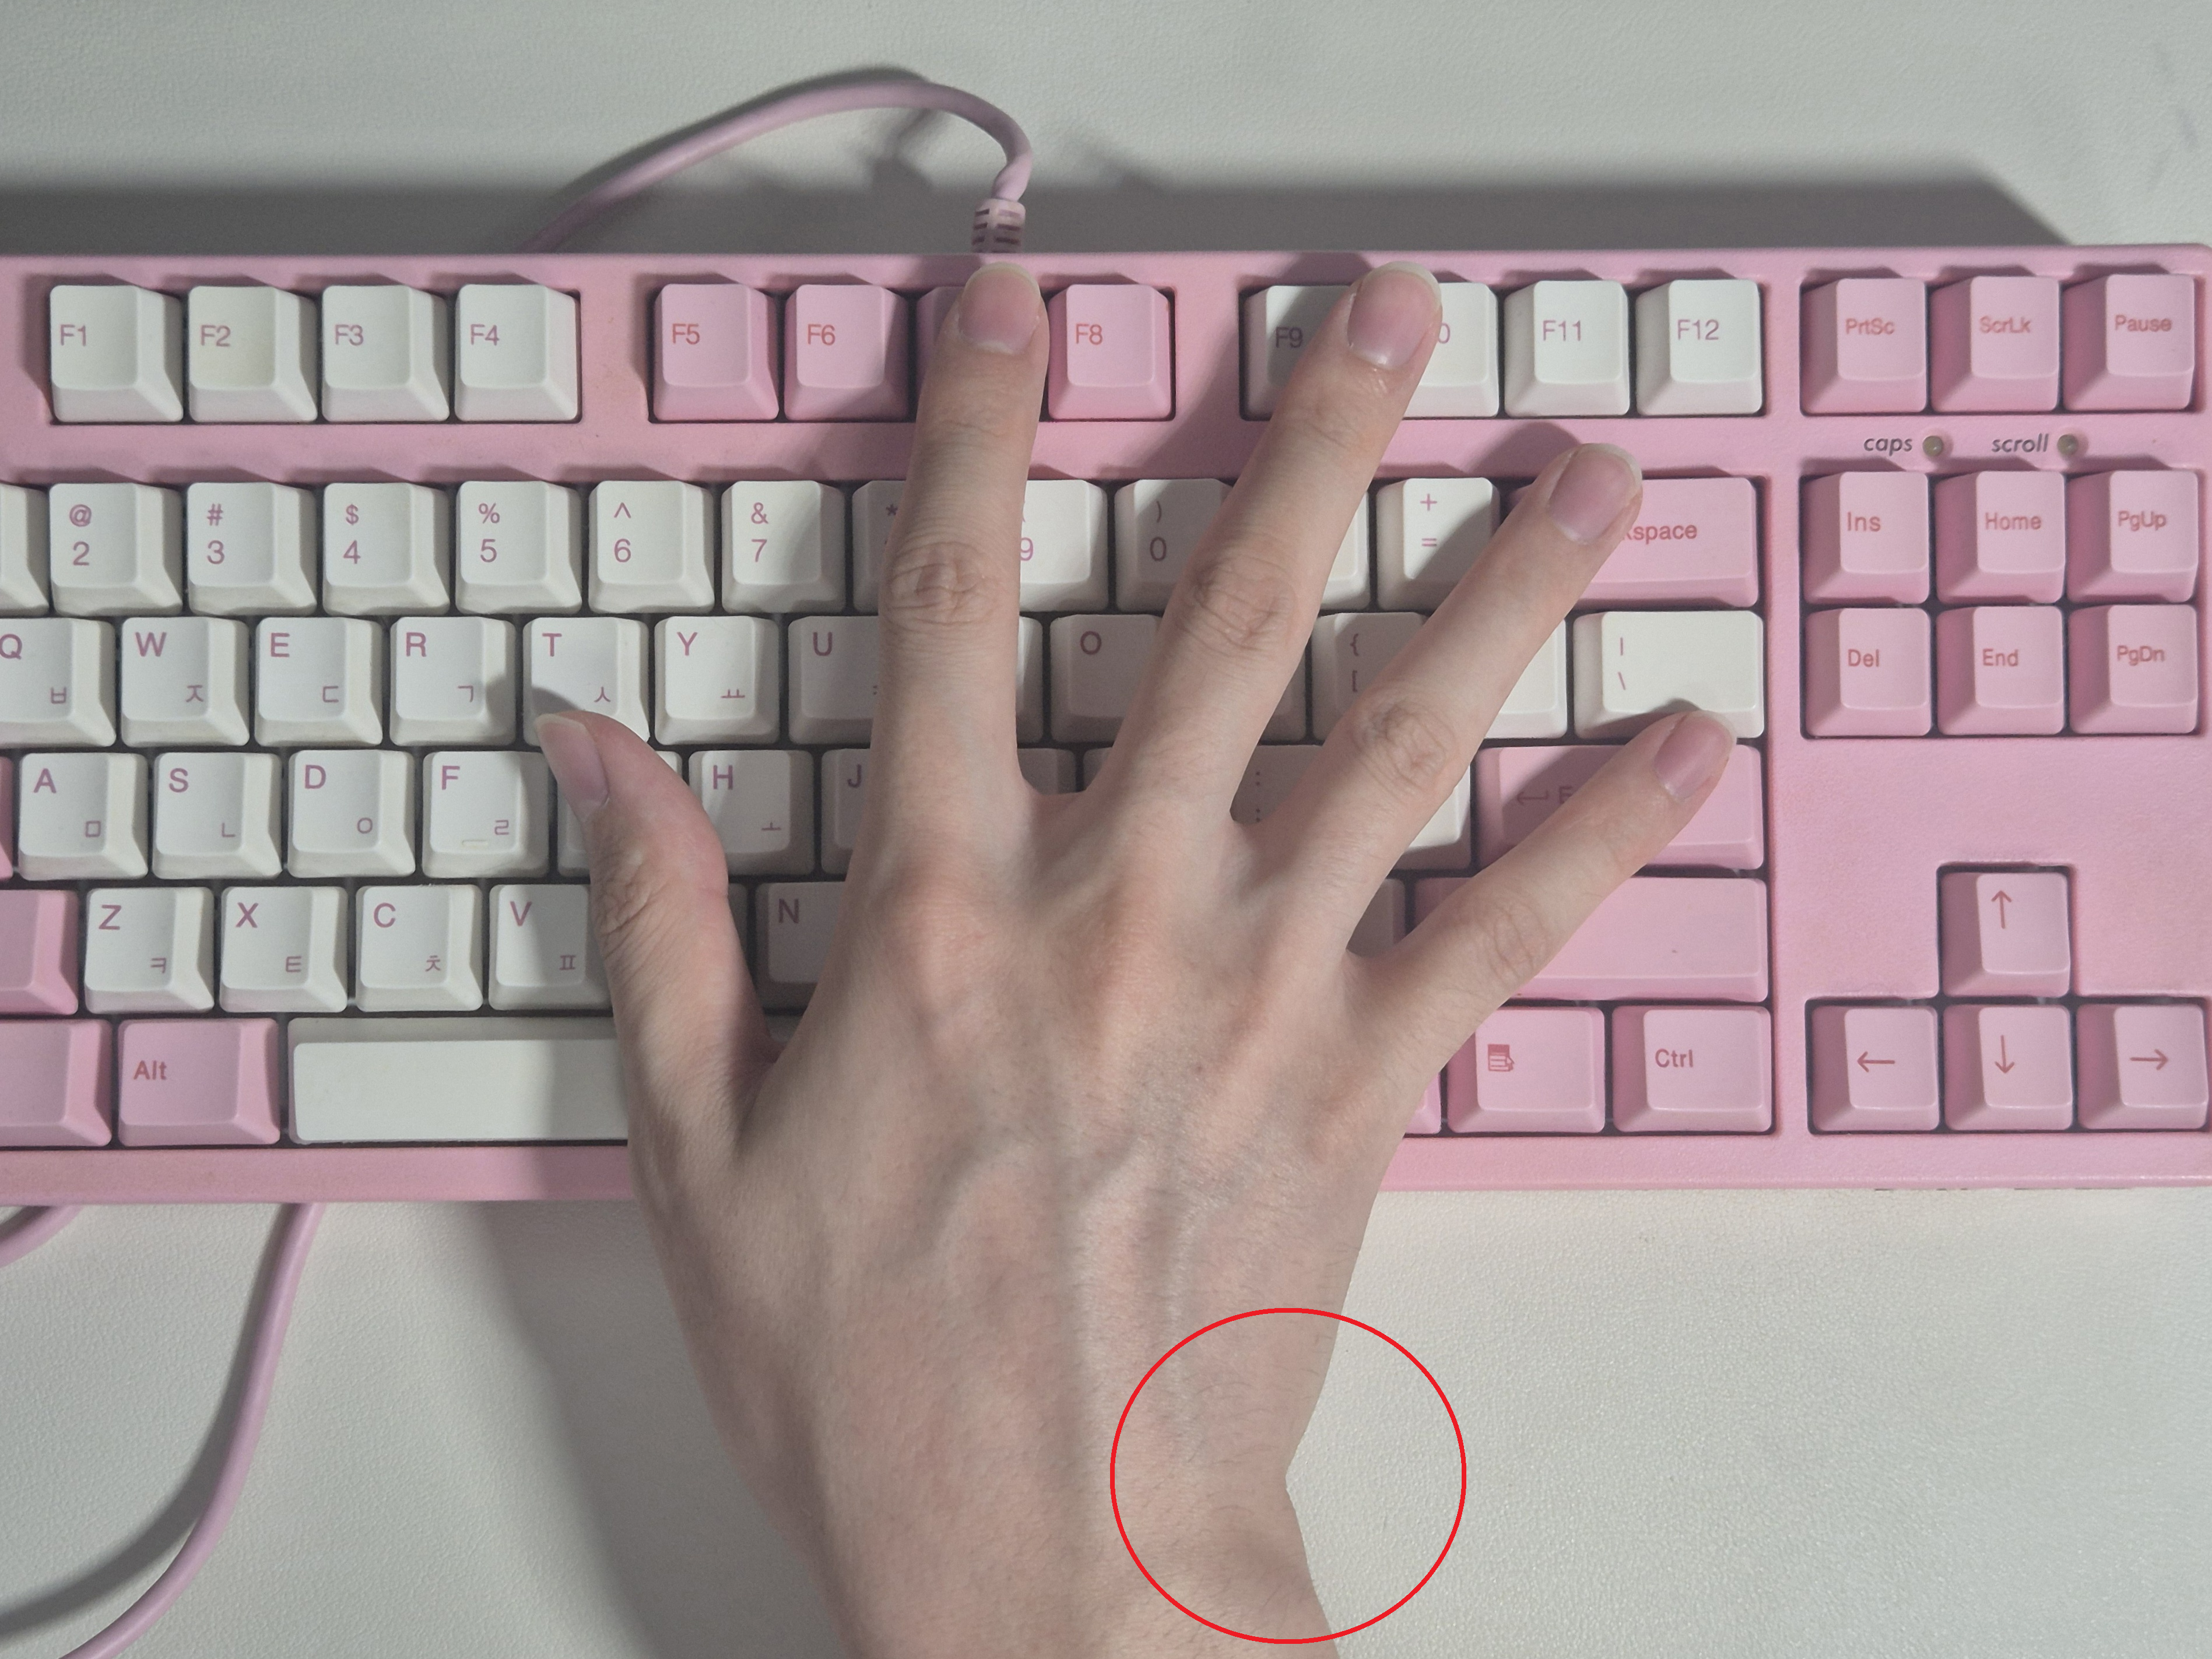
손목을 덜 움직이면서 사용할 수 있는 키보드를 찾다가 스플릿 키보드라는 형태를 알게 됐다. 스플릿 키보드는 좌우 본체가 분리돼 있어 어깨와 손목을 비교적 자연스러운 각도로 놓을 수 있었다. 엄지로 사용할 수 있는 키도 많았기 때문에 Backspace를 손가락이 닿기 쉬운 위치에 배치할 수도 있었다.
실제로 스플릿 키보드를 사용한 뒤부터는 Backspace를 누르기 위해 오른손을 크게 움직일 필요가 없어졌다. 이렇게 나는 손목의 건강과 삶의 만족도를 모두 챙겼다고 생각했다.
스플릿 키보드 1대 = HHKB 1대 + Rainy75 1대 🤯
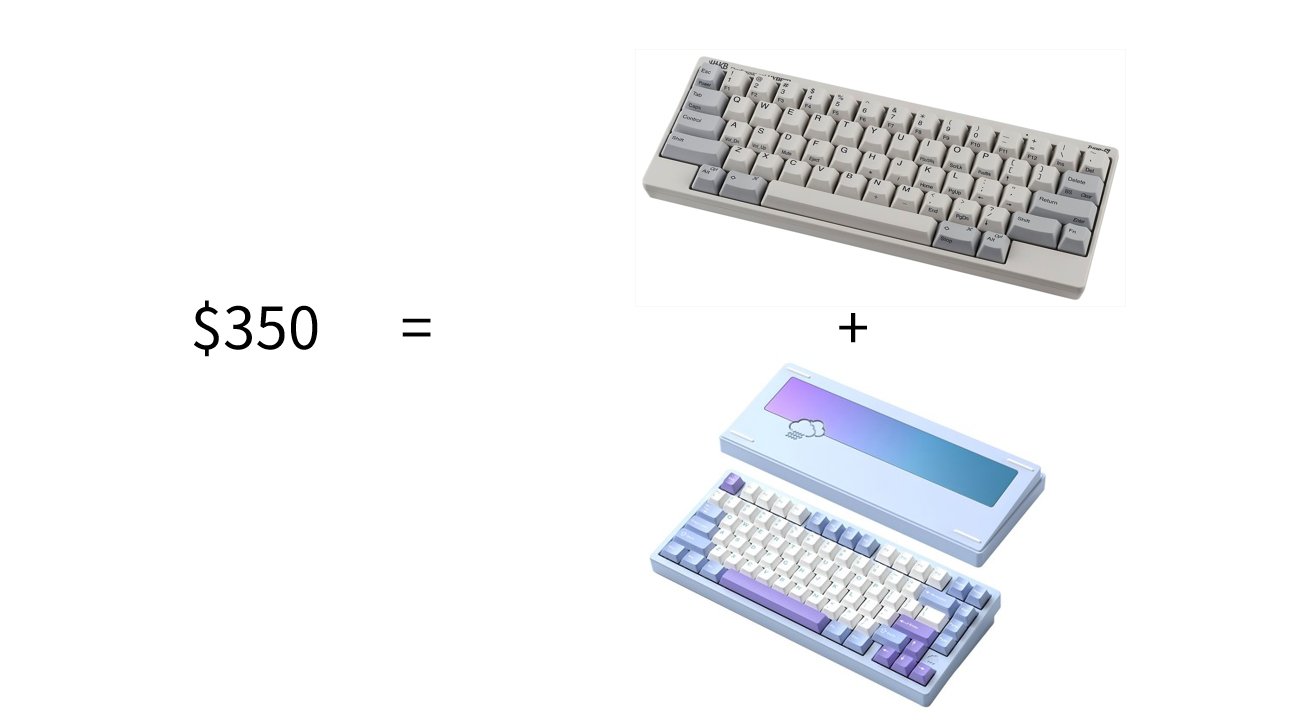
내게 첫 번째 스플릿 키보드는 사실상 ‘손목 치료 기기’처럼 느껴졌다. 손목을 편하게 만들어 주는 장비를 350달러에 구입했다고 생각하면 충분히 만족스러운 가격이었다.
하지만 곧 새로운 문제가 생겼다.
이 키보드를 집에서 써야 할까, 회사에서 써야 할까?
나는 집과 회사 모두에서 장시간 컴퓨터를 사용한다. 스플릿 키보드의 효과를 제대로 보려면 두 곳에 각각 한 대씩 필요했다. 한동안 키보드를 들고 출퇴근하기도 했지만, 좌우 본체와 케이블, 팜레스트까지 챙겨 다니는 일은 생각보다 귀찮았다. 그렇다면 한 대를 더 사면 되지 않을까 싶었지만, 같은 키보드를 두 대 구입하기에는 가격이 부담스러웠다.
돈으로도 풀리지 않는 문제
가격만이 내가 키보드를 직접 만들게 된 이유는 아니었다. 돈을 주고 새로운 스플릿 키보드를 구입하더라도, 내가 원하는 키 배치와 타건감을 모두 만족시키는 제품은 찾기 어려웠다.
B와 ㅠ는 같은 키지만, 사용하는 손은 달랐다
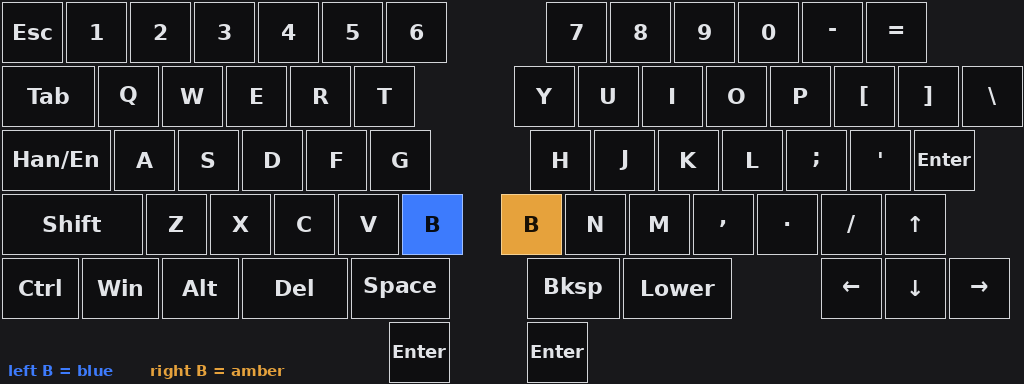
나는 영어를 입력할 때 B를 왼손으로 누르지만, 같은 위치에 있는 한글 ㅠ는 오른손으로 입력하는 습관이 있다.
일반 키보드에서는 같은 물리 키를 양손으로 누를 수 있기 때문에 문제가 없다. 하지만 좌우가 완전히 분리된 스플릿 키보드에서는 B/ㅠ 키가 왼쪽 본체에만 존재했다. 영어를 입력할 때는 아무런 문제가 없었지만, 한글을 입력할 때마다 오른손이 있어야 할 키를 찾아 허공을 누르게 됐다.
Matdol의 오른쪽 본체에 키가 하나 더 있는 이유가 바로 이것이다. 오른쪽 N 키 왼편에 ㅠ 전용 키를 추가해, 영어와 한글을 입력할 때 기존에 사용하던 손의 움직임을 그대로 유지할 수 있도록 했다.
치료 기기 같았던 타건감
내가 찾아본 스플릿 키보드 중 상당수는 휴대성과 얇은 두께, 가벼운 무게를 중요하게 설계돼 있었다. 인체공학적인 입력 장치로서는 훌륭했지만, 묵직하고 낮은 타건음을 좋아하는 내 취향과는 거리가 있었다.
일반적인 커스텀 키보드는 키를 누르는 행위 자체에서 만족감을 준다. 반면 당시 사용하던 스플릿 키보드는 손목을 편하게 해주기 위한 도구에 가까웠다. 나는 스플릿 키보드에서도 일반 커스텀 키보드처럼 묵직한 타건감과 소리를 느끼고 싶었다.
결국 가격뿐 아니라 레이아웃과 타건감까지 해결하려면 직접 만드는 것이 가장 확실해 보였다.
Prototype V1 — 일단 동작했다
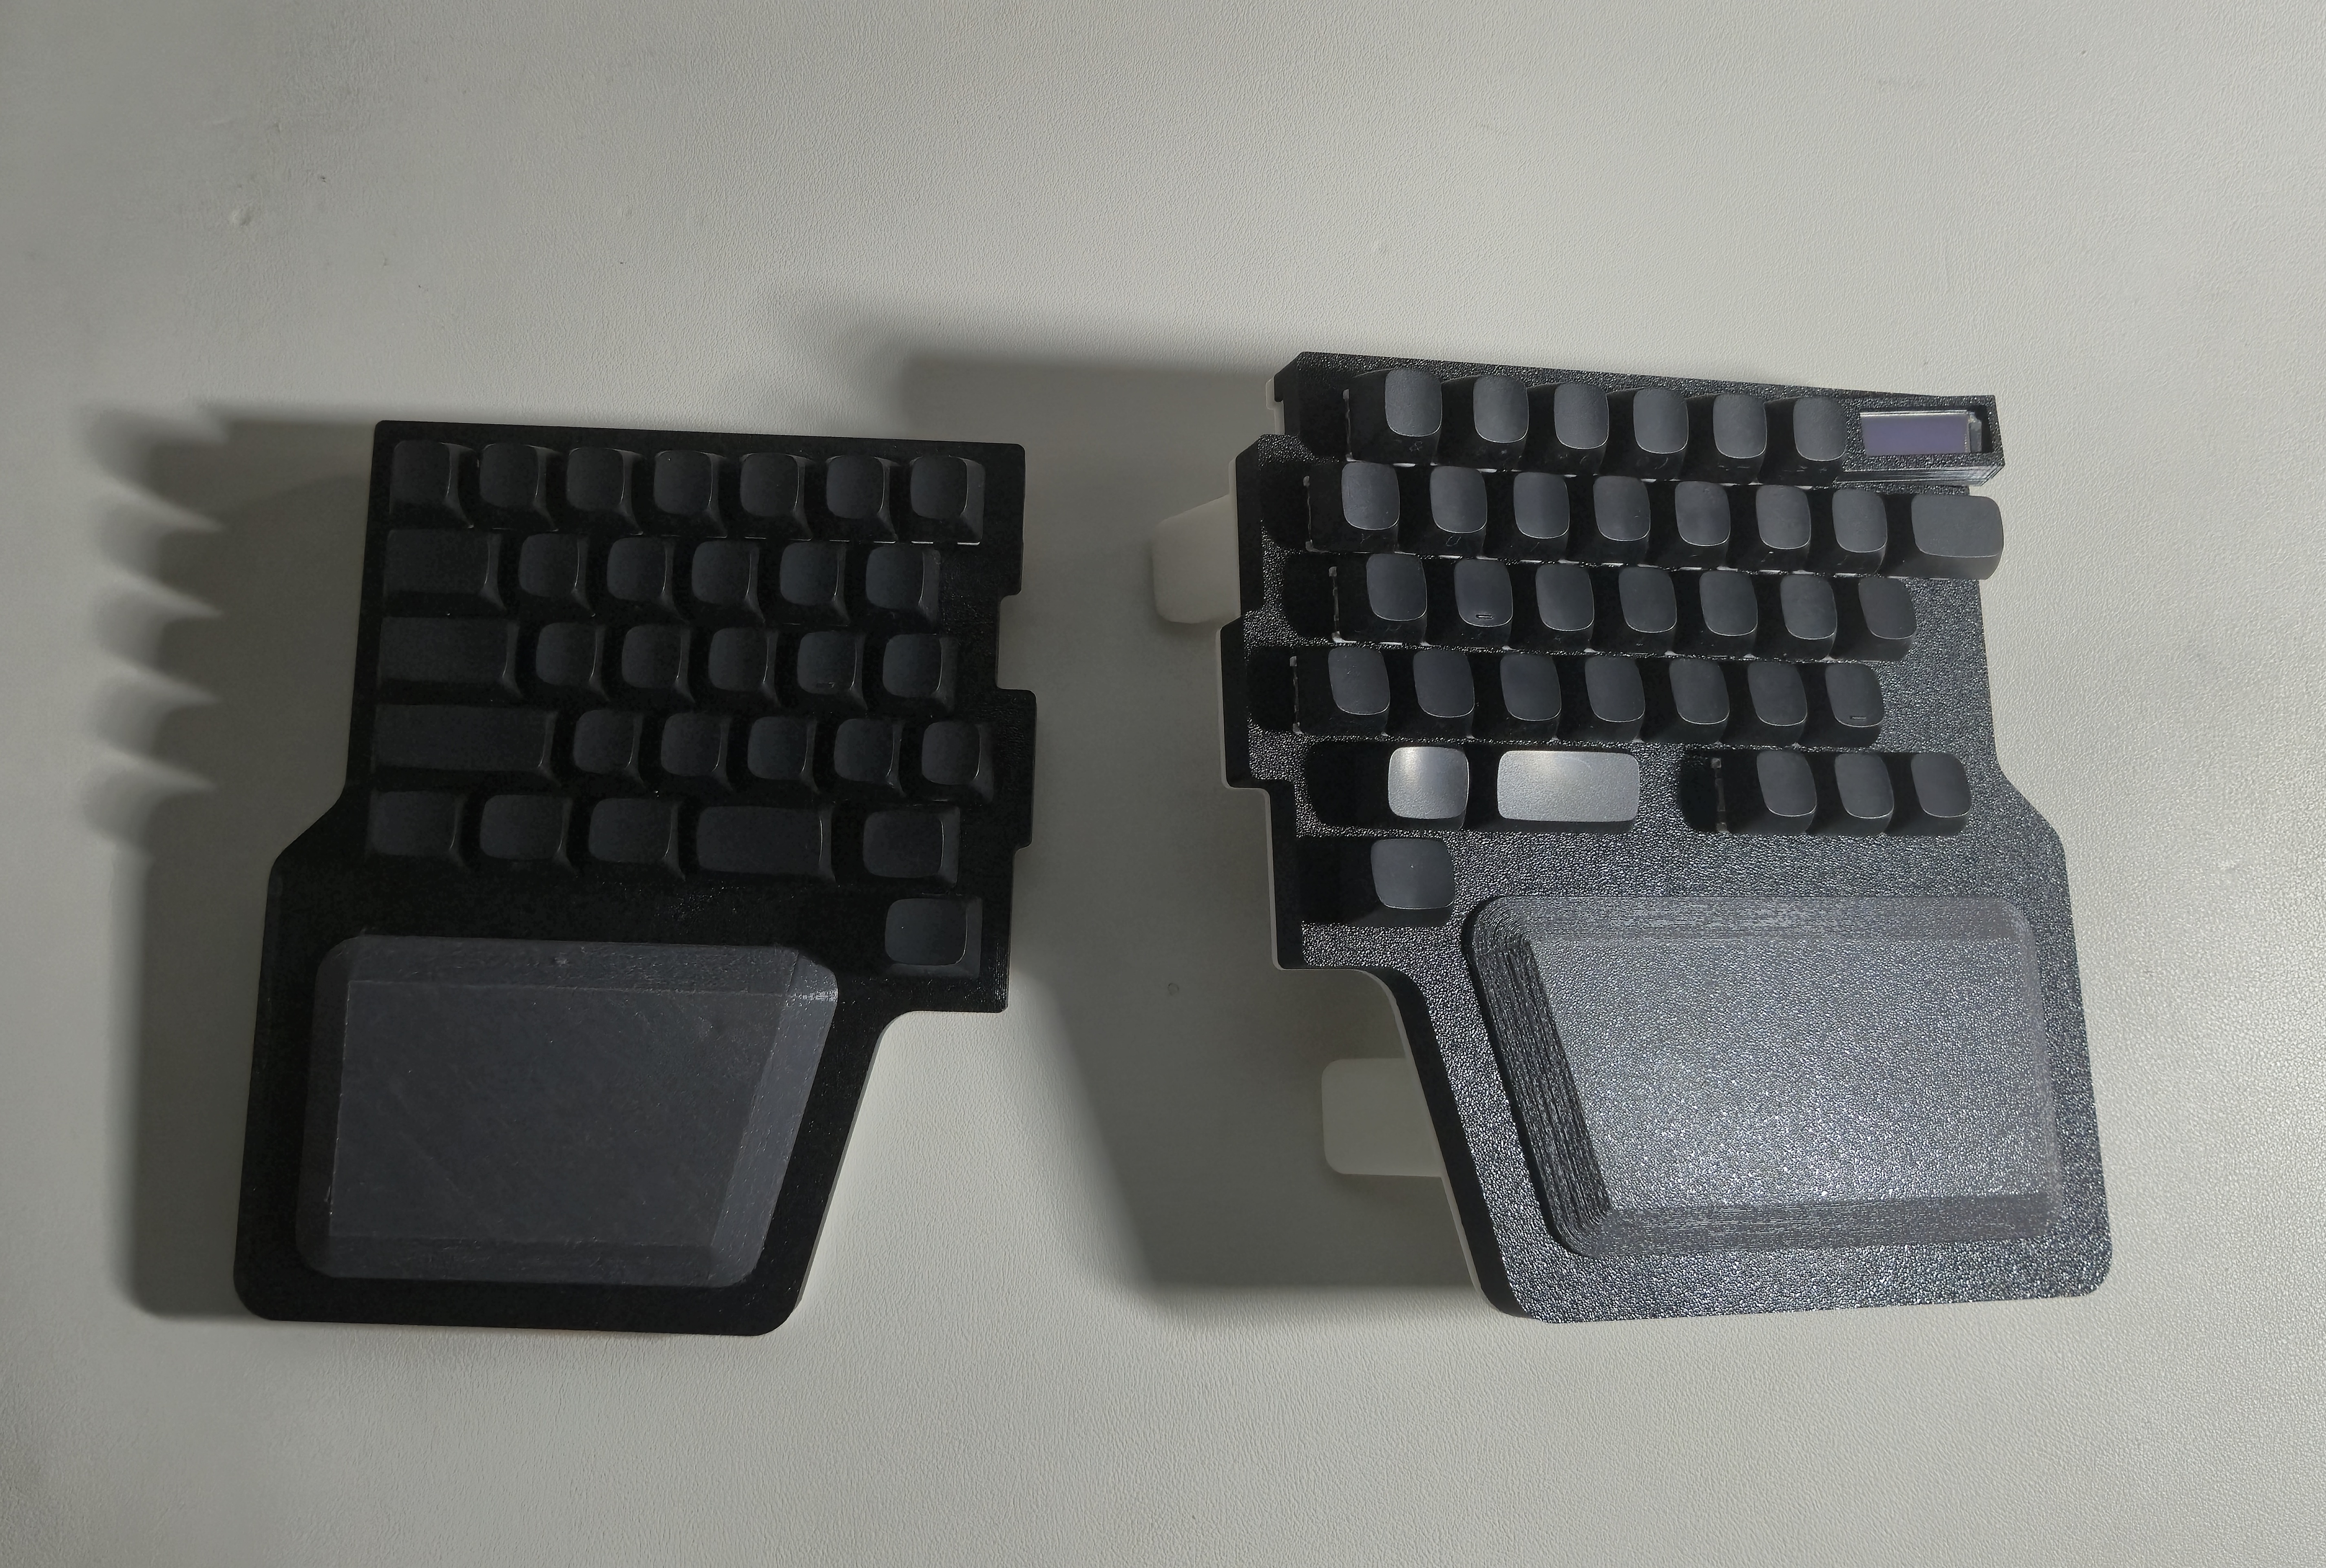
그렇게 첫 번째 나만의 스플릿 키보드를 만들기 시작했다. V1은 다음 세 가지를 검증하기 위한 프로토타입이었다.
- 오른손에 추가한
ㅠ키가 실제로 유용한가 - Backspace를 중앙에 가까운 위치로 옮기면 손목 움직임을 줄일 수 있는가
- 직접 설계한 PCB와 ZMK 펌웨어로 일상적인 업무가 가능한가
오른쪽 본체의 N 키 왼편에는 ㅠ 입력을 위한 키를 추가했고, Backspace는 오른쪽 본체의 안쪽 상단에 배치해 오른손을 바깥쪽으로 꺾지 않고 누를 수 있도록 했다.
케이스와 텐팅 부품은 모두 3D 프린터로 제작했다. 기존 스플릿 키보드에서도 오른쪽 본체에 텐팅을 사용하고 있었기 때문에 V1에도 비슷한 각도의 텐팅 구조를 적용했다. TPU 필라멘트를 이용해 팜레스트도 만들었지만, 당시에는 TPU 출력 환경이 안정적이지 않아 표면과 탄성이 만족스럽지 않았다.
오른쪽 상단에는 작은 LCD도 배치했다. 처음에는 배터리 잔량이나 연결 상태를 표시하려 했지만, 개발 과정에서 필요성이 낮다고 판단해 최종적으로는 사용하지 않았다.
PCB 설계부터 ZMK 기반 펌웨어 개발, 케이스 3D 모델링까지 전 과정을 직접 진행했다. 모두 처음 해보는 작업이었기 때문에 필요한 내용을 하나씩 공부하며 만들어야 했고, 퇴근 후 남는 시간에만 작업하다 보니 V1을 완성하기까지 약 1년이 걸렸다.
V1은 레이아웃과 전자 설계의 가능성을 검증하는 데에는 성공했다. 오른손 ㅠ 키와 Backspace 배치는 실제로 유용했고, 직접 만든 키보드로 업무를 하는 것도 가능했다.
문제는 그 주변에 있었다.
3개월 만에 사용을 중단한 이유
V1은 약 3개월 동안 사용했다. 그러던 어느 날 컨트롤러 모듈이 고장 났다. 원칙적으로는 고장 난 모듈만 교체하면 되는 문제였지만, V1은 수리성을 전혀 고려하지 않은 구조였다. 컨트롤러를 교체하려면 케이스와 내부 배선을 대부분 분해해야 했고, 사실상 키보드 한 대를 다시 만드는 것과 비슷한 작업량이 필요했다. 결국 V1은 수리하지 못한 채 창고로 향했다.
V1을 완성하고 약 2년이 흐른 뒤, 집에서는 다시 일반 텐키리스 키보드를 사용하고 있었다. 그러다 창고에 보관된 V1을 다시 보게 됐다. 그동안 PCB와 3D 모델링, 3D 프린팅 경험도 더 쌓인 상태였고, 처음 만들 때와 달리 이제는 무엇을 어떻게 만들어야 하는지 조금은 알고 있었다.
그래서 이번에는 단순히 동작하는 키보드가 아니라, 매일 사용하고, 고장 나면 수리하며, 반복해서 분해하고 조립할 수 있는 제품에 가까운 키보드를 만들어 보기로 했다.
V1의 목표가 “키보드가 동작하는가”였다면, V2의 목표는 “실제로 계속 사용하고 싶은가”였다.
V2 — Matdol
V2의 설계 목표
V1을 실제로 사용하면서 확인한 문제를 바탕으로 V2의 목표를 정했다.
- 고장 난 부품을 쉽게 교체할 수 있을 것
- 반복해서 분해하고 조립할 수 있을 것
- 케이스를 열지 않고 펌웨어를 업데이트할 수 있을 것
- 연결 상태와 동작 여부를 외부에서 확인할 수 있을 것
- 스플릿 키보드의 인체공학적인 장점과 커스텀 키보드의 타건감을 함께 가질 것
- V1보다 하나의 완성된 제품처럼 보일 것
교체 가능한 컨트롤러 모듈
V1을 더 이상 사용하지 못하게 된 가장 직접적인 원인은 컨트롤러 모듈의 고장이었다. 문제는 고장 자체보다 교체가 어렵다는 점이었다.
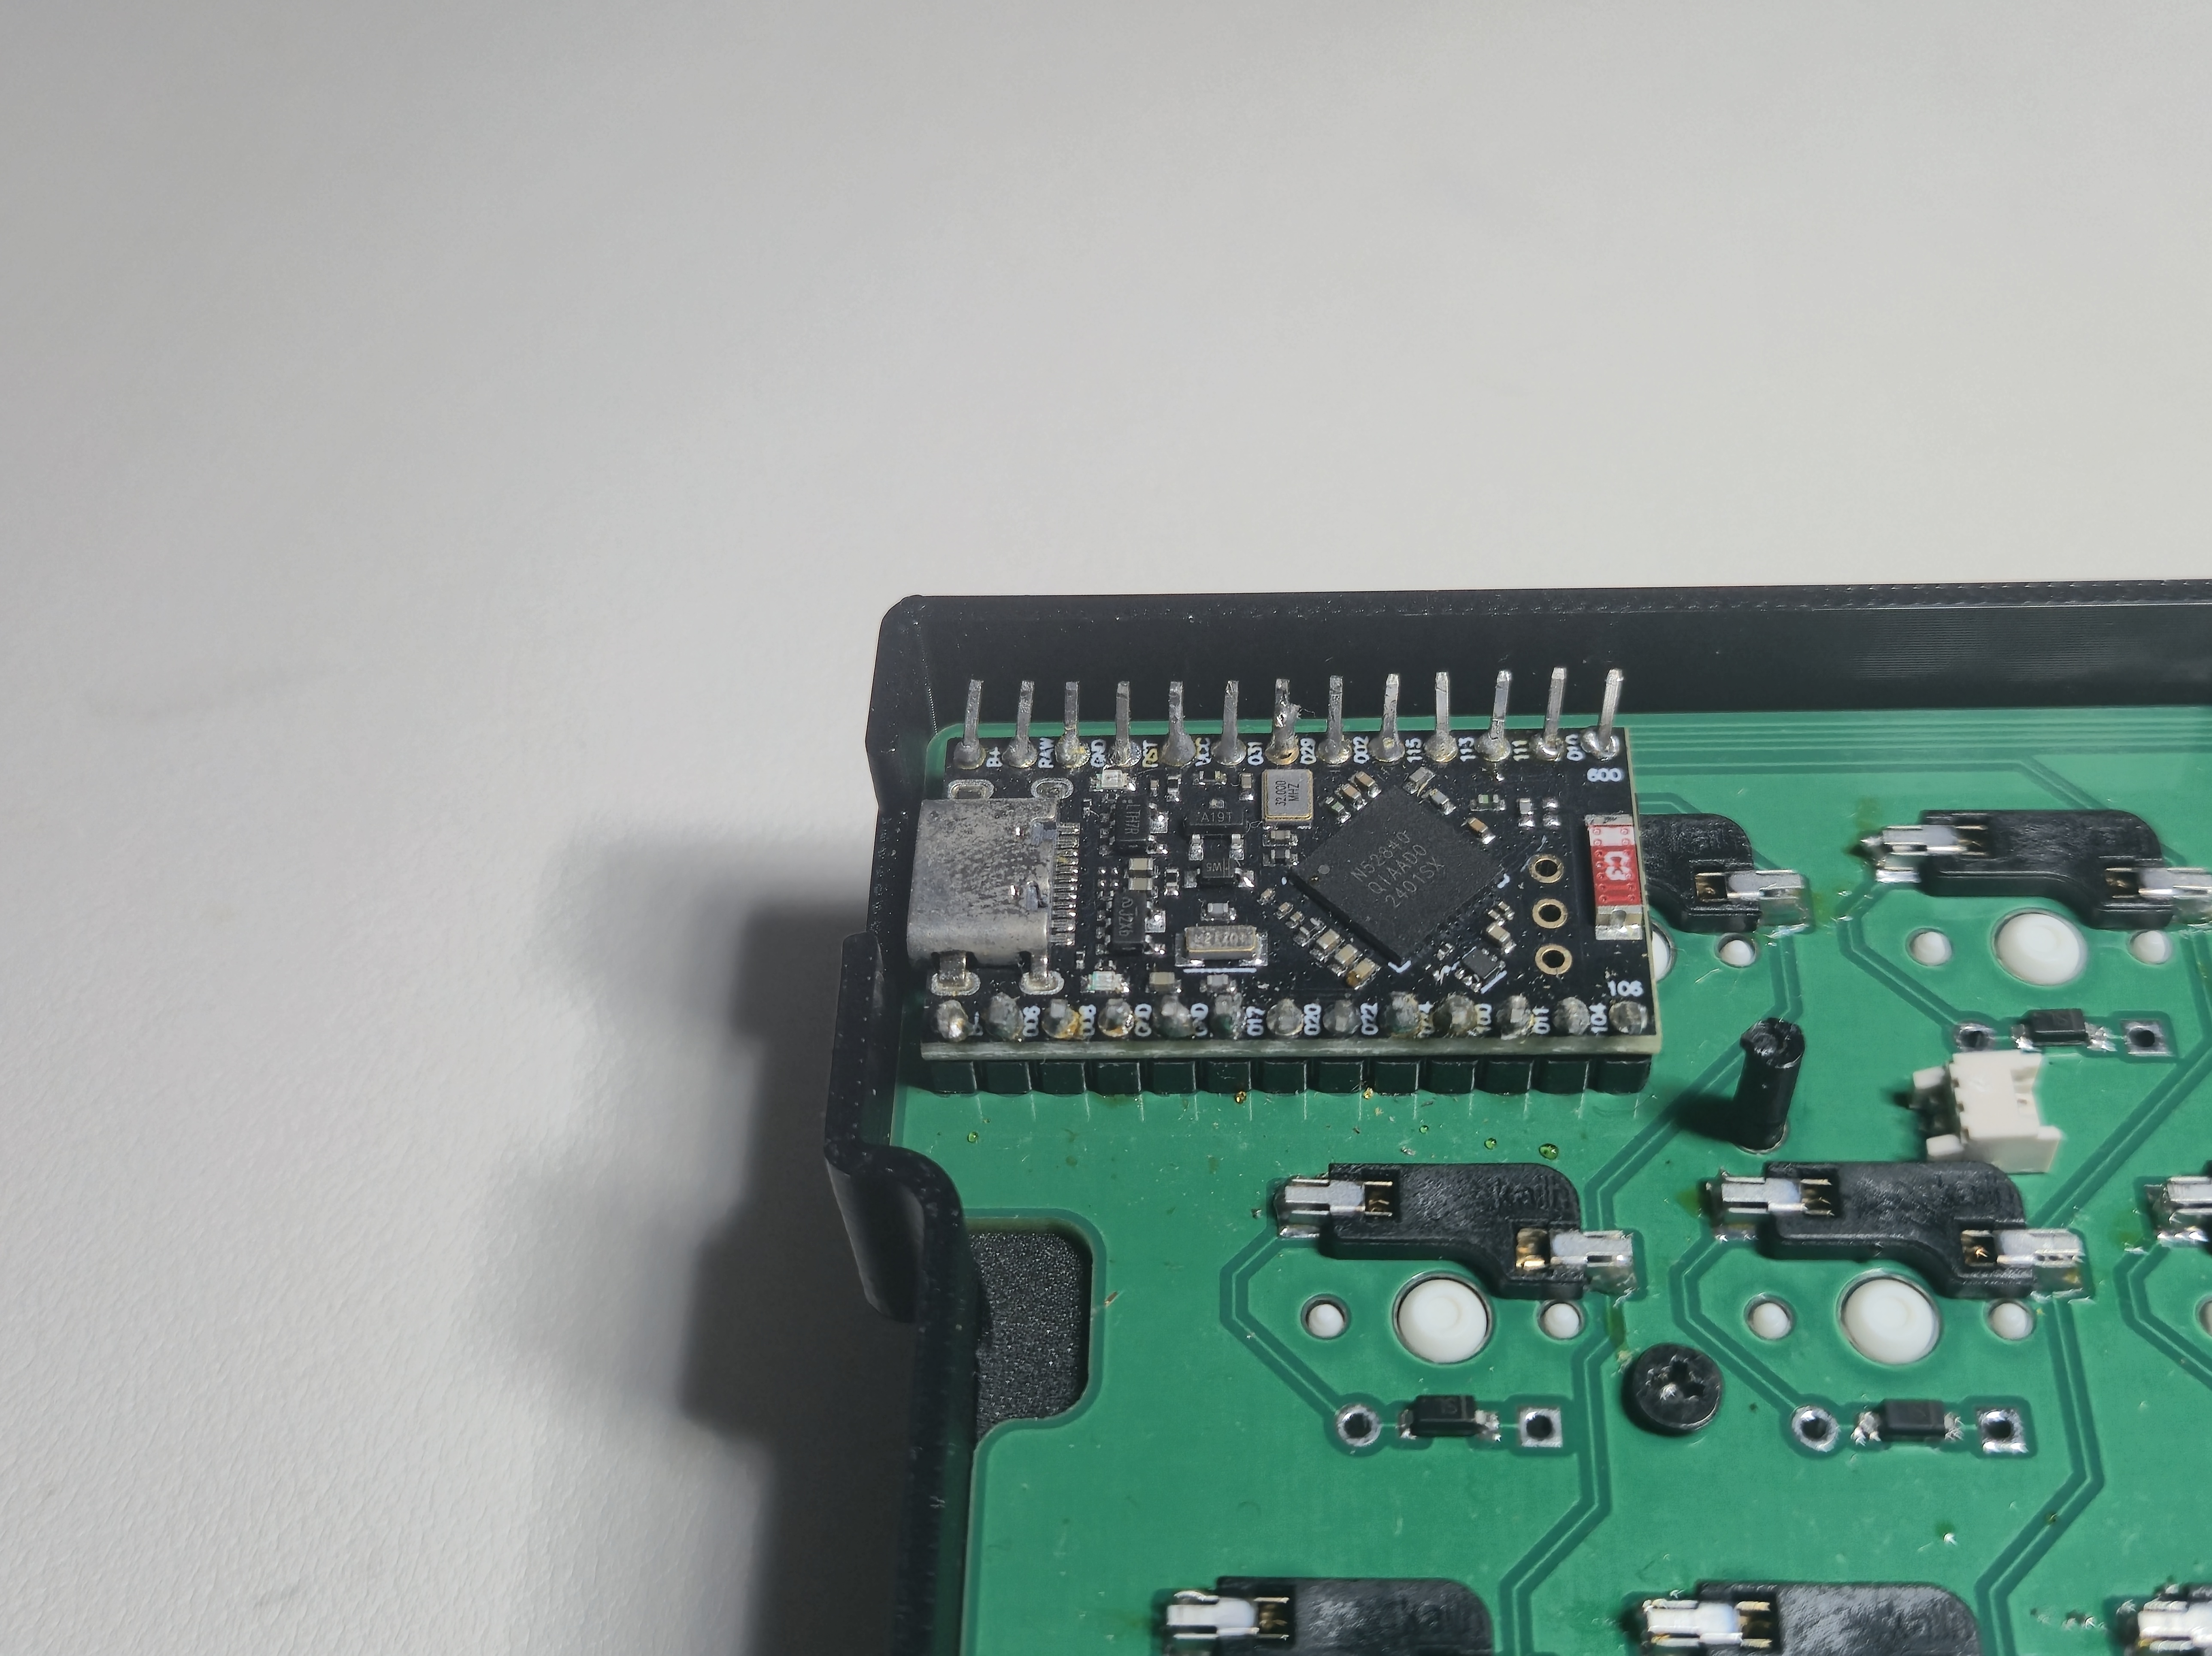
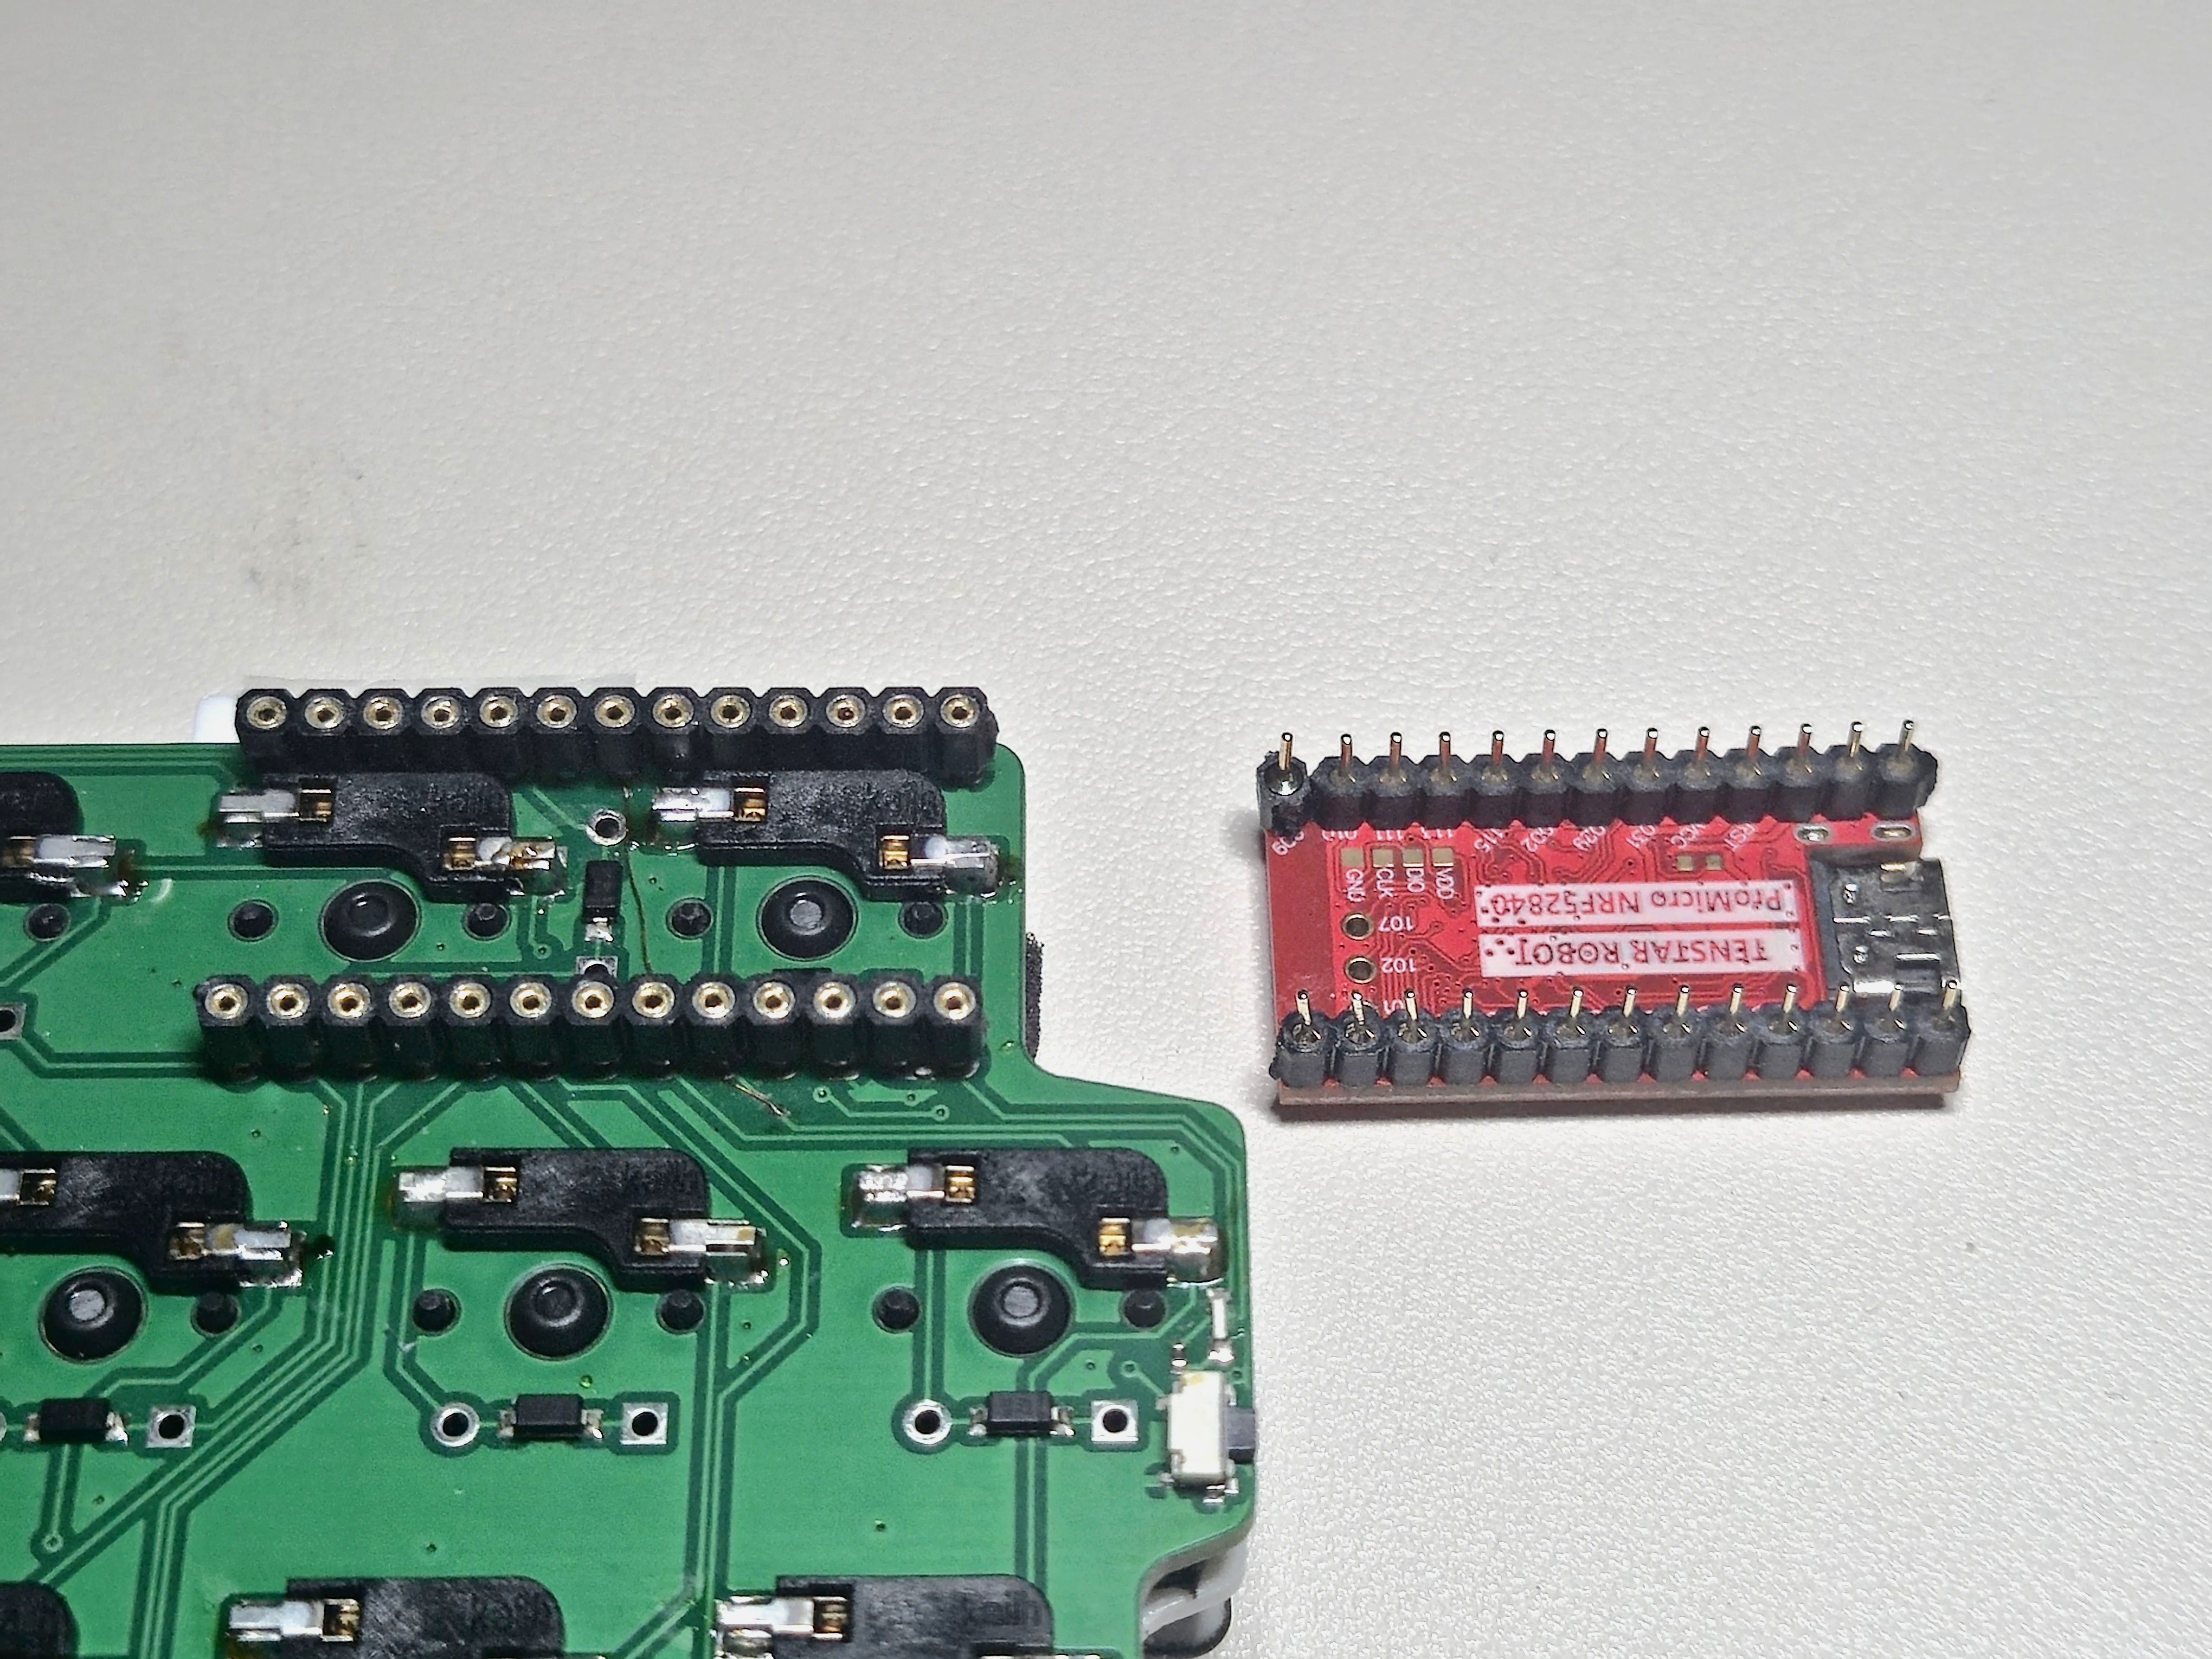
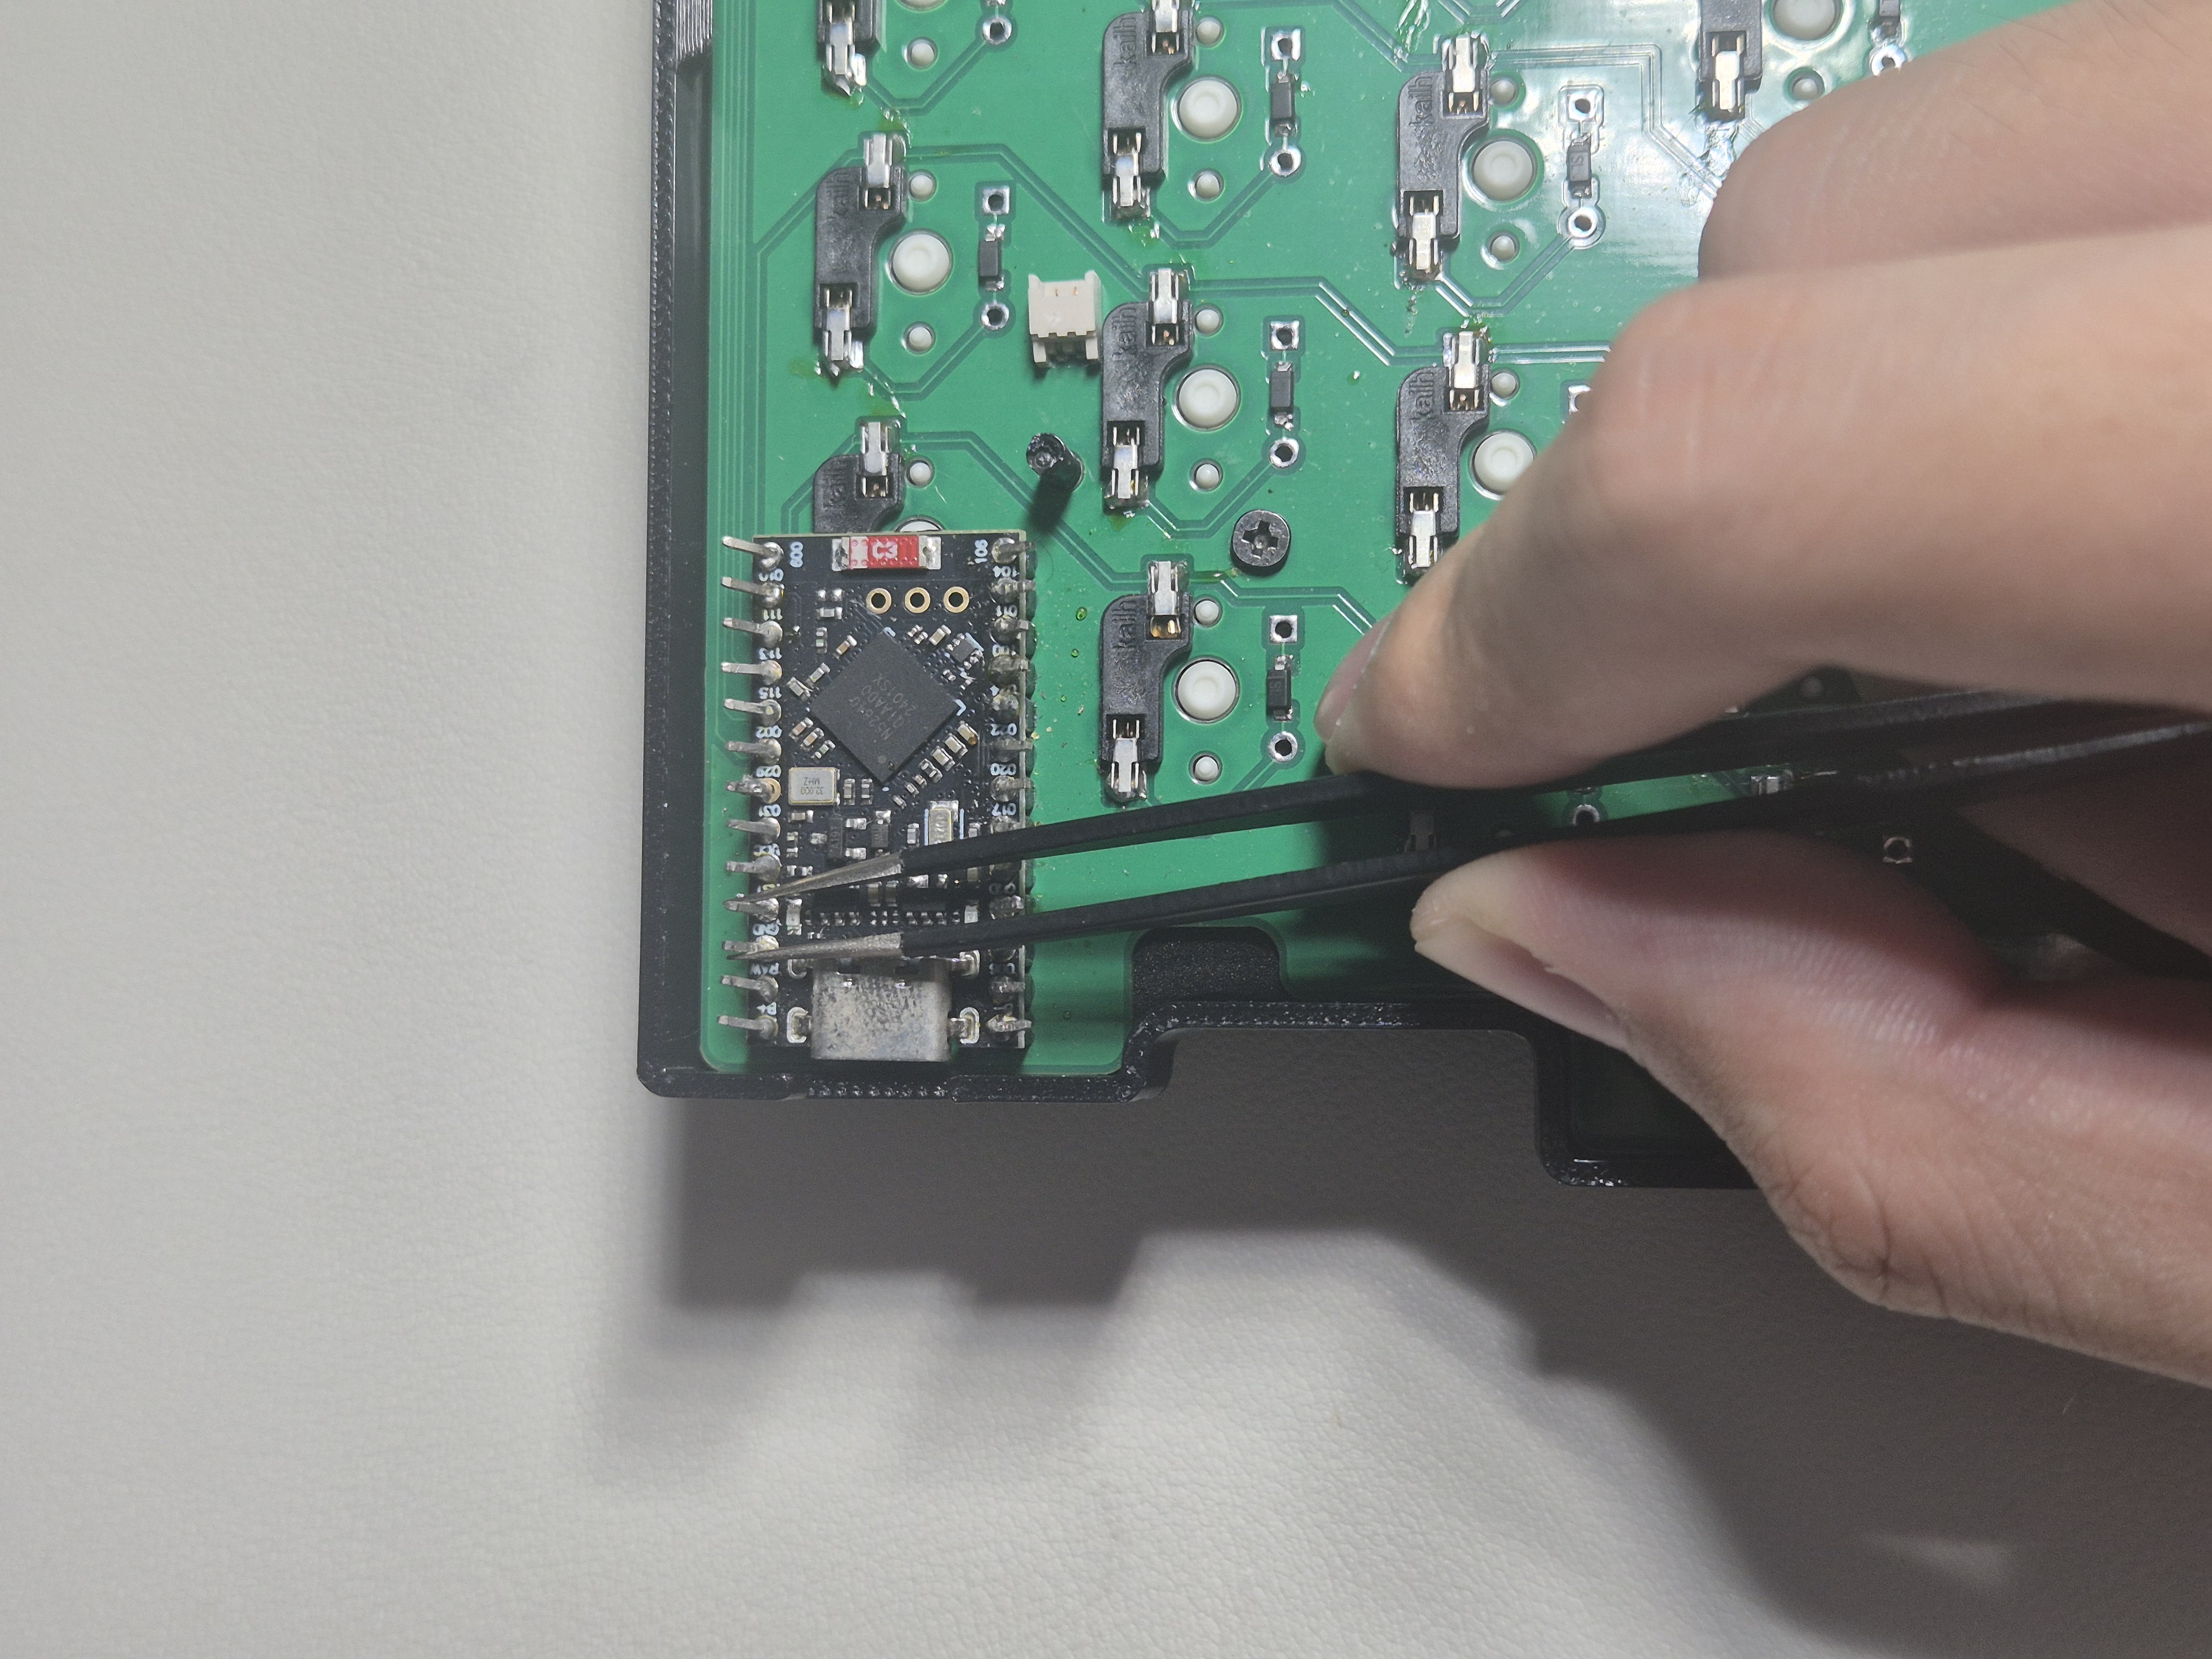
V2에서는 컨트롤러 모듈을 PCB에 직접 고정하지 않고 핀헤더 소켓에 장착하도록 설계했다. 이제 컨트롤러가 고장 나더라도 PCB 전체를 다시 만들거나 납땜할 필요 없이, 기존 모듈을 뽑고 새 모듈을 장착할 수 있다.
V1에서 실제 고장을 겪은 뒤에야 수리성이 단순한 편의 기능이 아니라 제품을 계속 사용할 수 있게 해주는 핵심 조건이라는 것을 알게 됐다.
반복해서 분해하고 조립할 수 있는 케이스
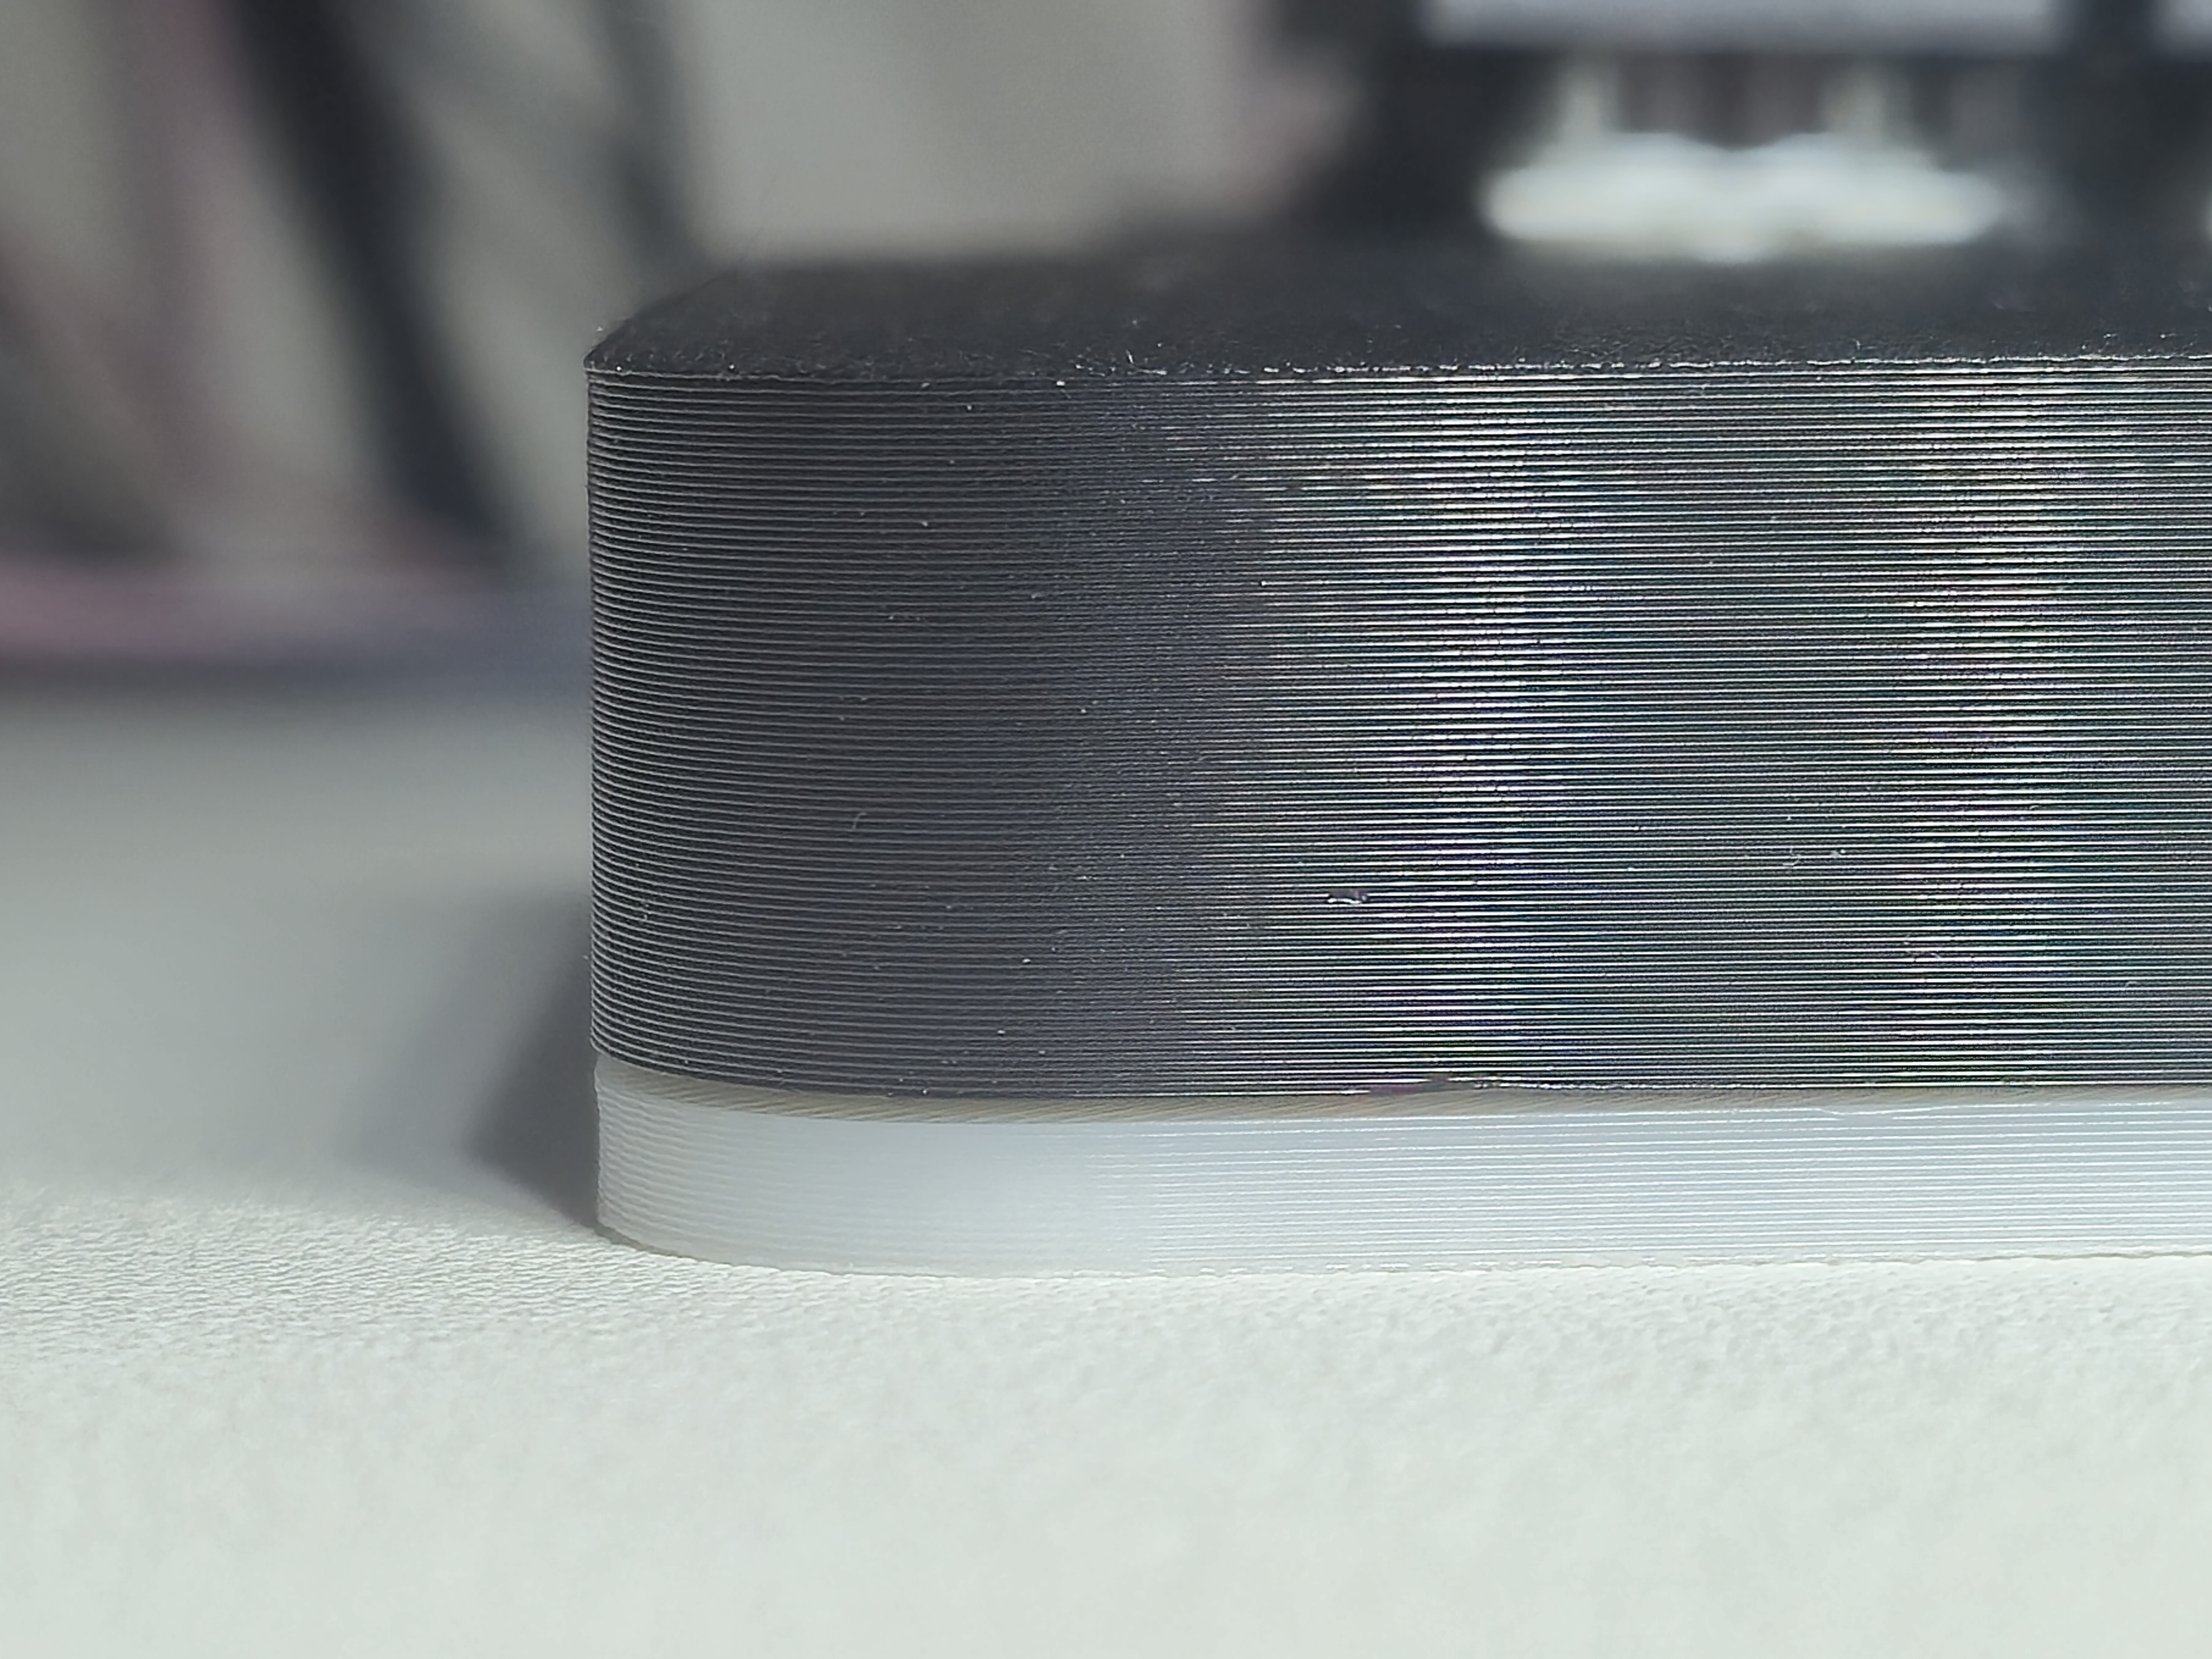
V1의 상판과 하판은 스냅핏과 나사를 함께 사용해 결합했다. 하지만 FDM 출력 편차와 반복적인 분해로 인해 스냅핏의 결합력이 일정하지 않았다. 일부 구간은 헐거워졌고, 일부 구간은 끝까지 닫히지 않았다. 케이스를 분해할 때마다 하판을 크게 휘어야 했기 때문에 변형이 생기는 문제도 있었다.
V2에서는 스냅핏을 제거하고 모든 결합부를 나사 체결 방식으로 변경했다. 상판과 하판을 고르게 눌러줄 수 있도록 나사 위치를 분산했고, 반복적으로 분해하고 다시 조립해도 특정 부위에 큰 변형이 발생하지 않도록 했다.
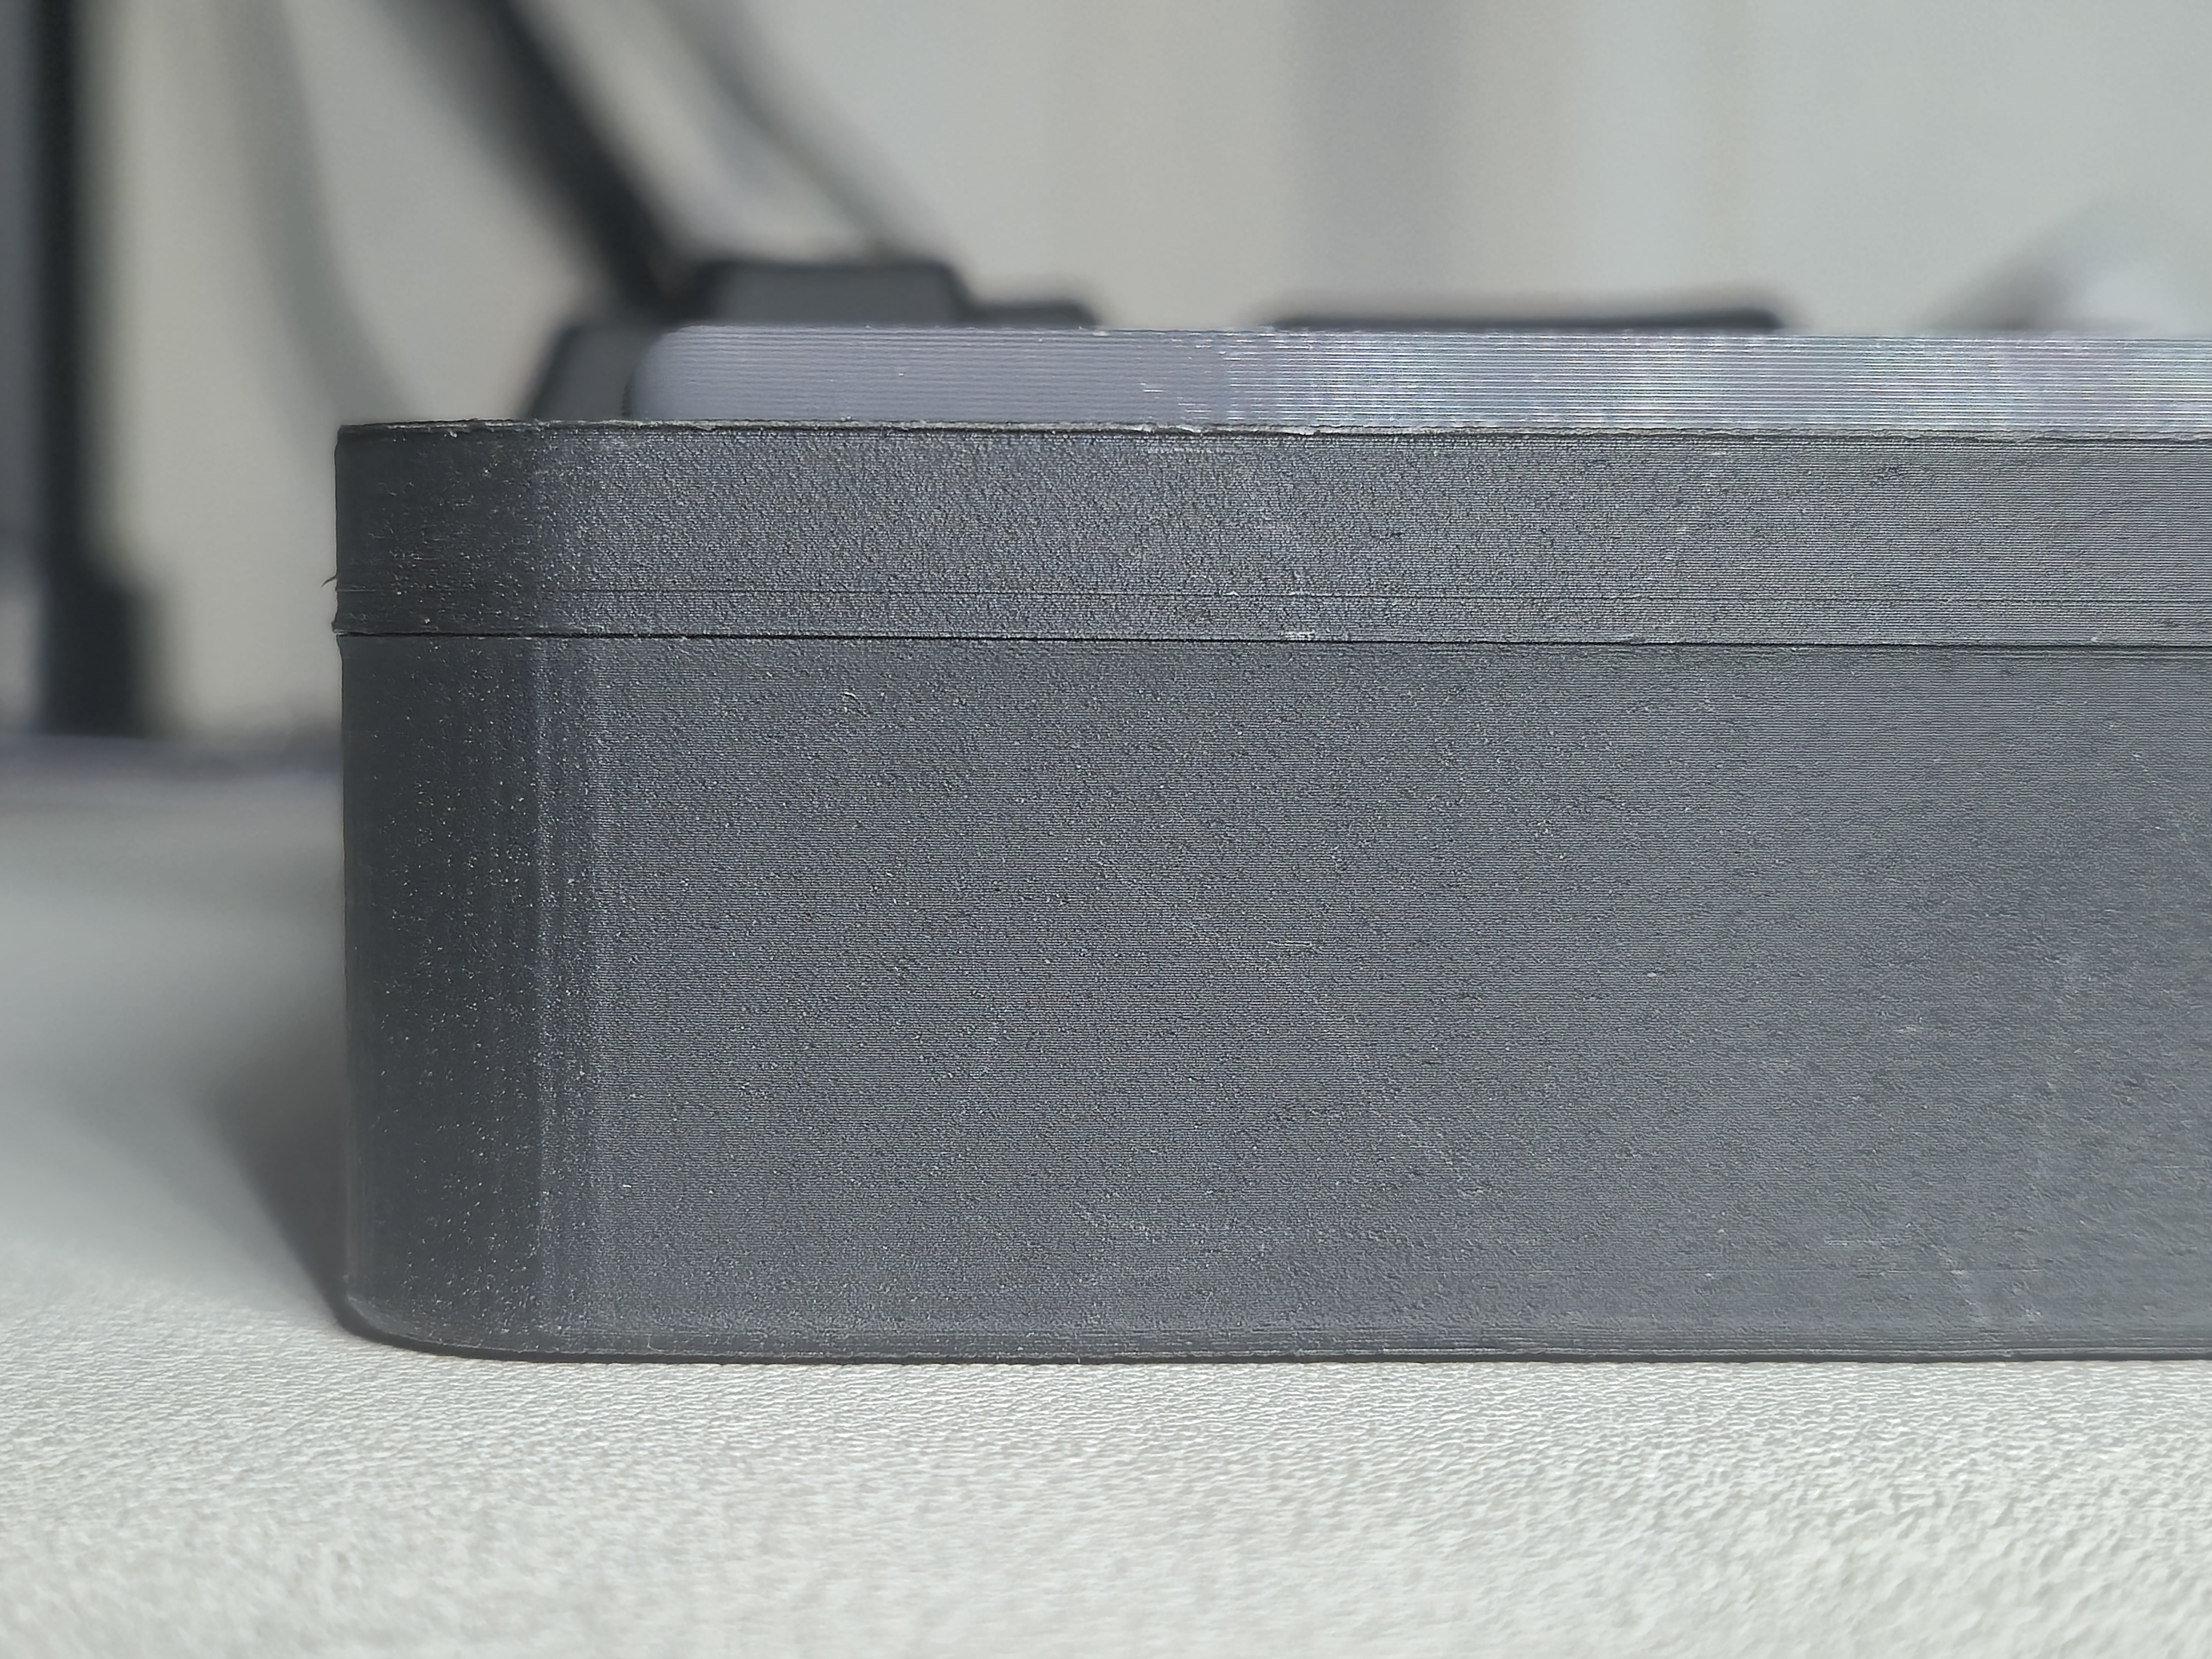
이 구조가 완벽한 것은 아니다. 현재도 상판과 하판 사이의 분할선이 눈에 띄는 문제가 남아 있다. 하지만 V1처럼 분해 과정에서 케이스가 손상되거나 결합력이 급격히 떨어지는 문제는 크게 줄었다.
케이스를 열지 않고 펌웨어 업데이트하기
V1에서는 펌웨어를 업데이트하려면 하판을 분해한 뒤 컨트롤러 모듈에 있는 버튼을 직접 눌러야 했다. 키맵이나 기능을 수정할 때마다 케이스를 분해해야 했기 때문에 개발 과정에서도 불편했고, 완성 후 유지보수에도 적합하지 않았다.
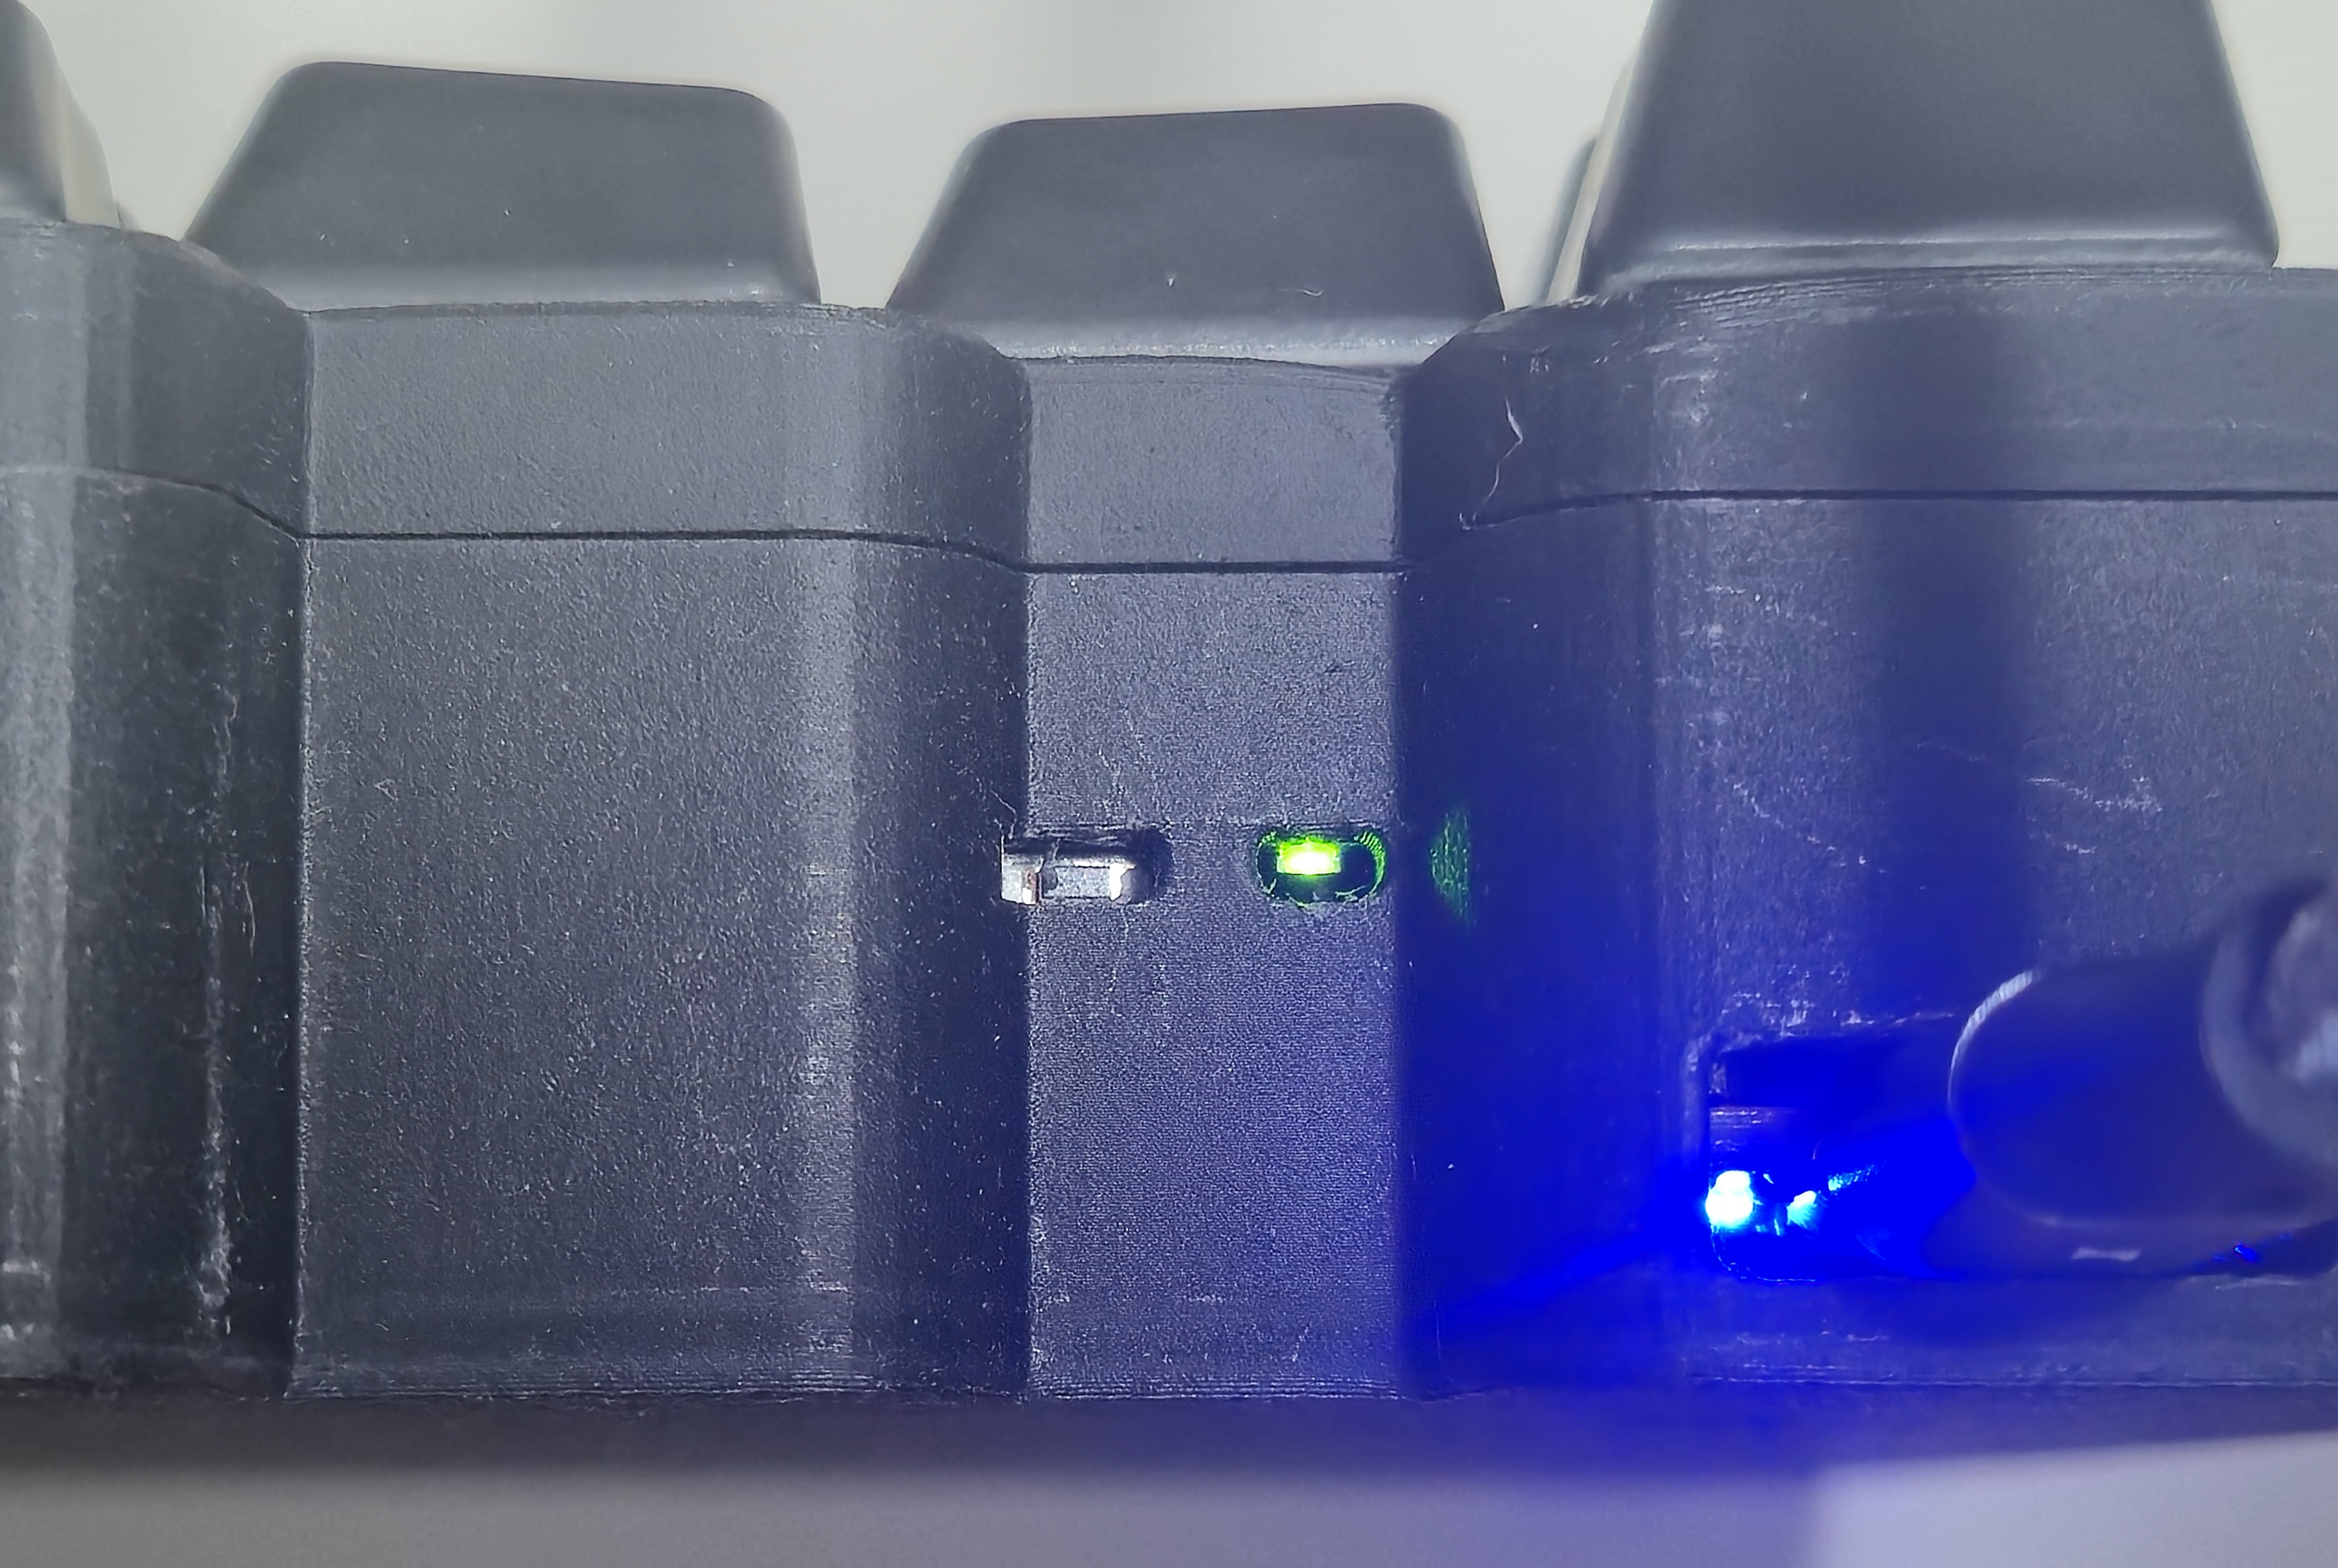
V2에서는 펌웨어 업데이트에 필요한 핀을 PCB 외부 버튼과 연결해, 하판을 열지 않고도 펌웨어 업데이트 모드로 진입할 수 있게 했다. 또한 Bluetooth 연결 상태와 키보드의 동작 여부를 확인할 수 있도록 상태 LED를 추가했다.
작은 변화지만 실제 사용성과 개발 편의성은 크게 좋아졌다.
65키 비대칭 레이아웃
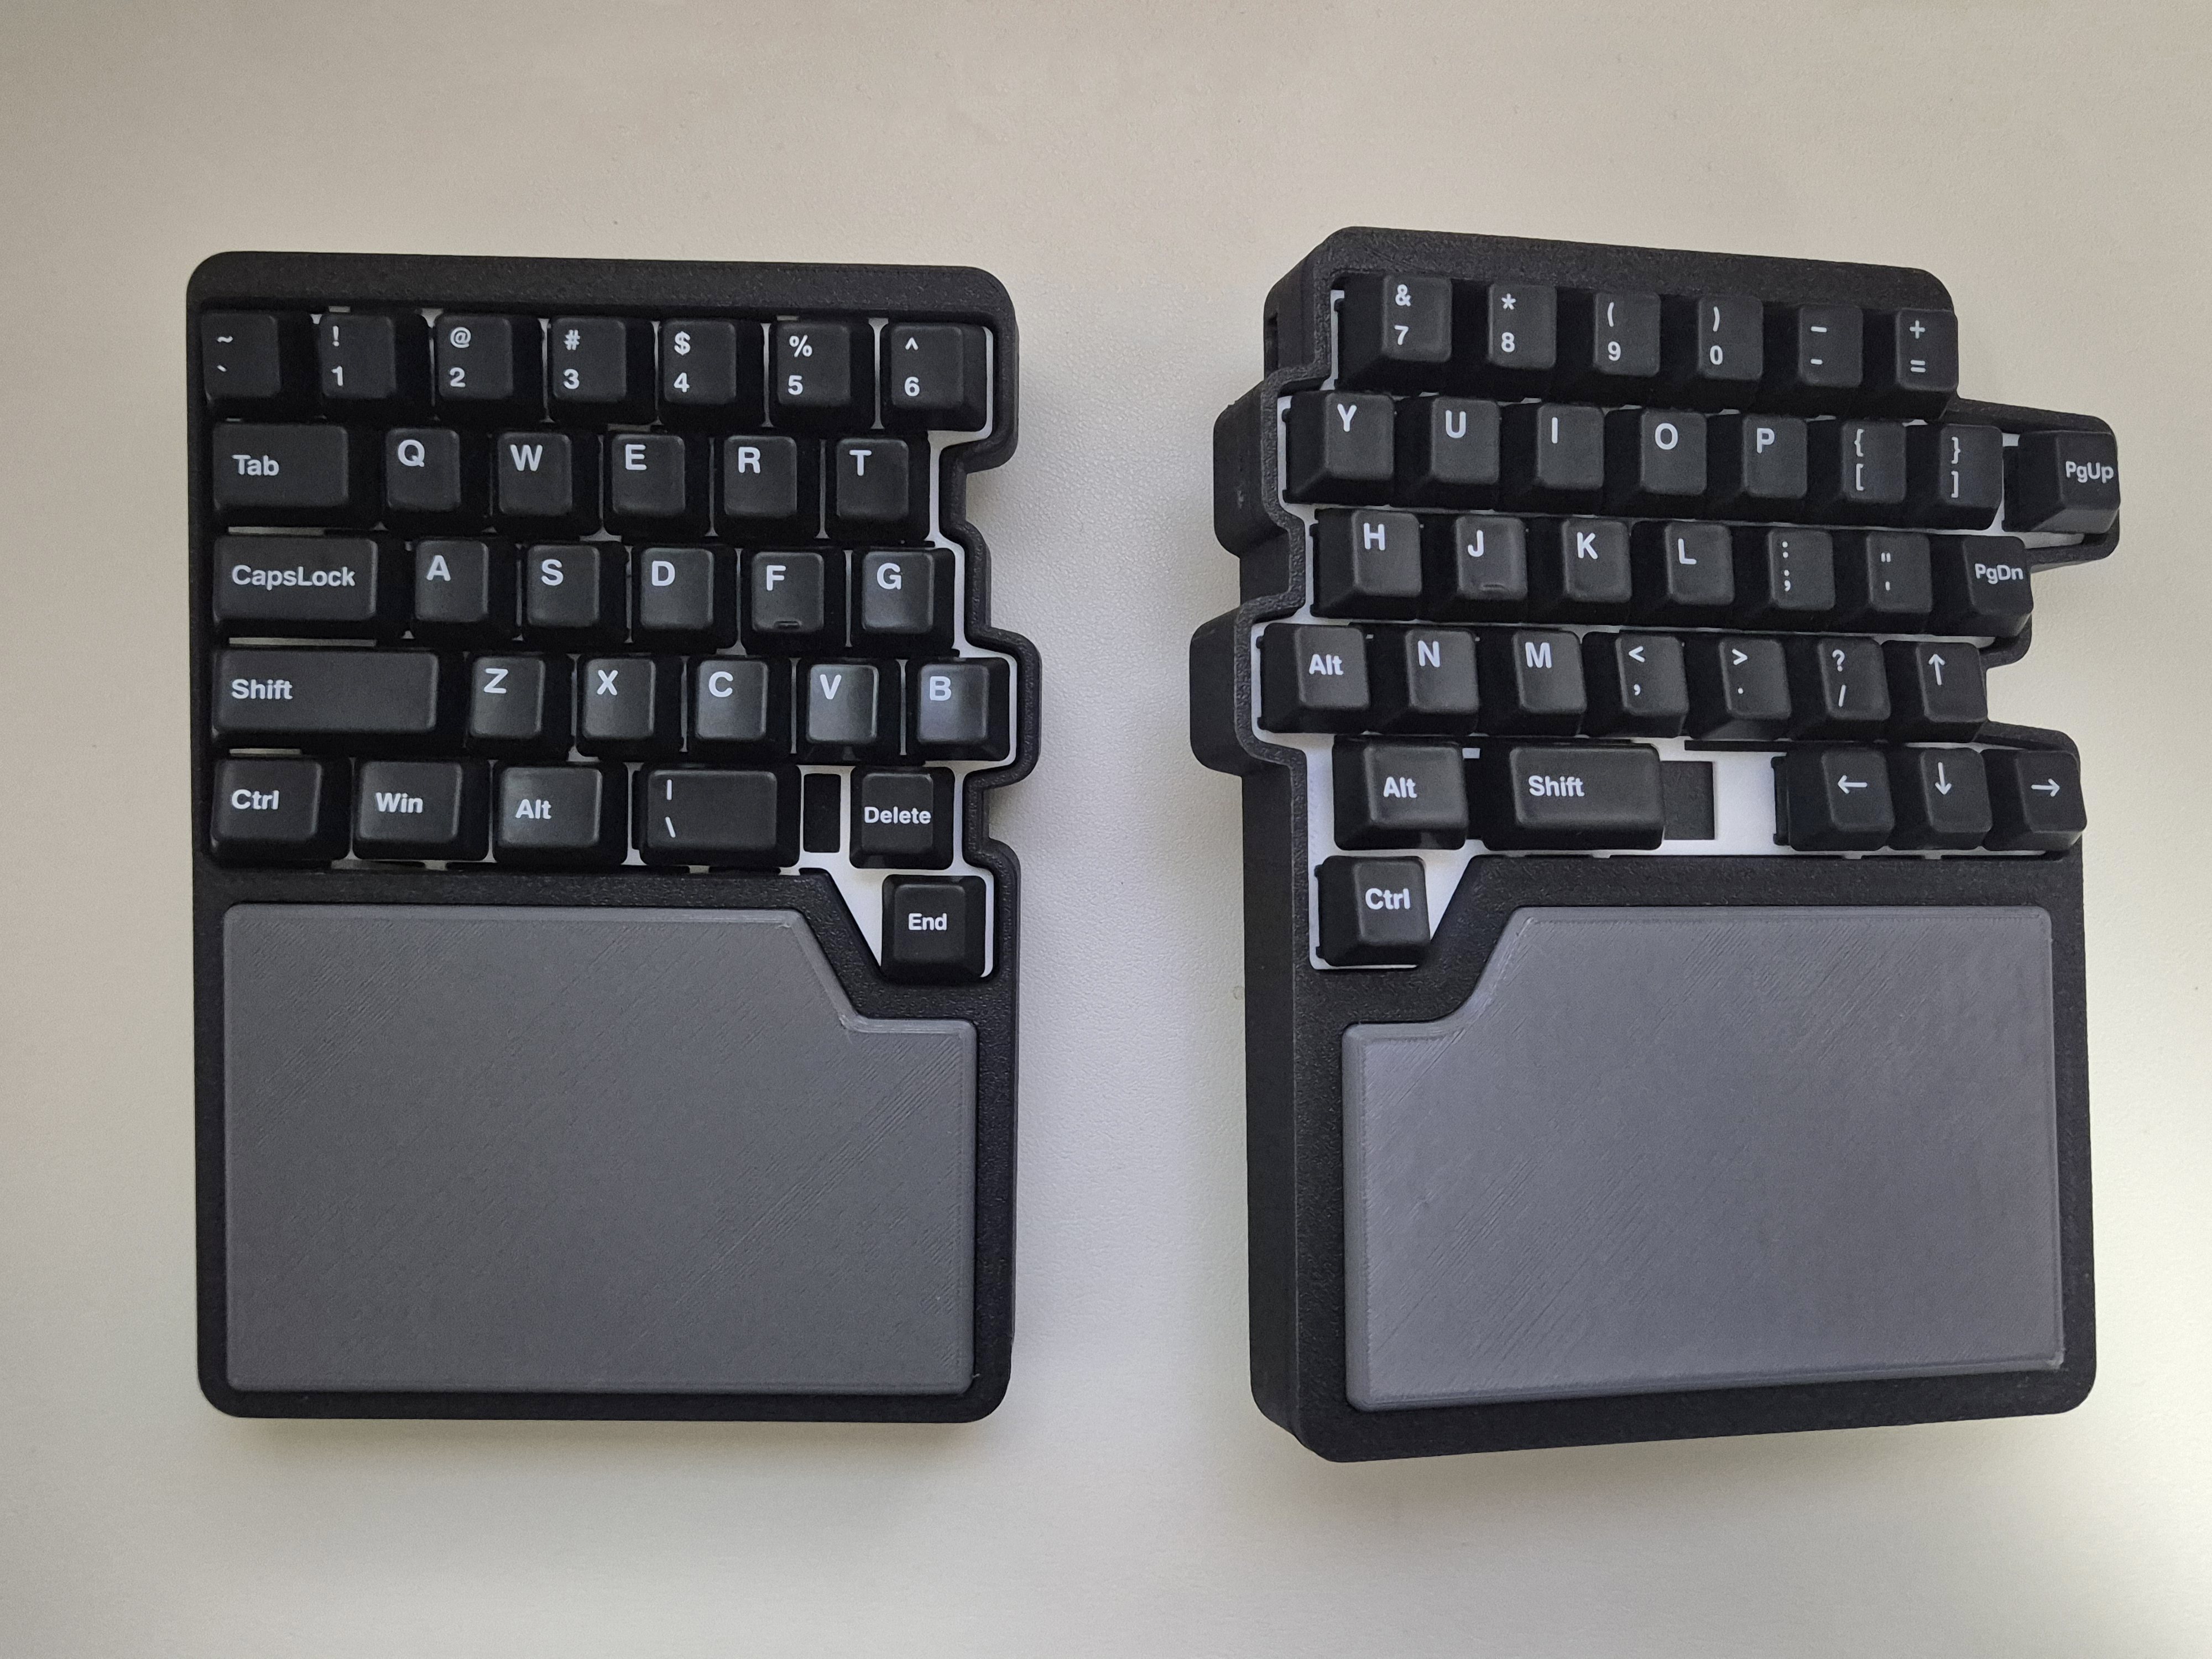
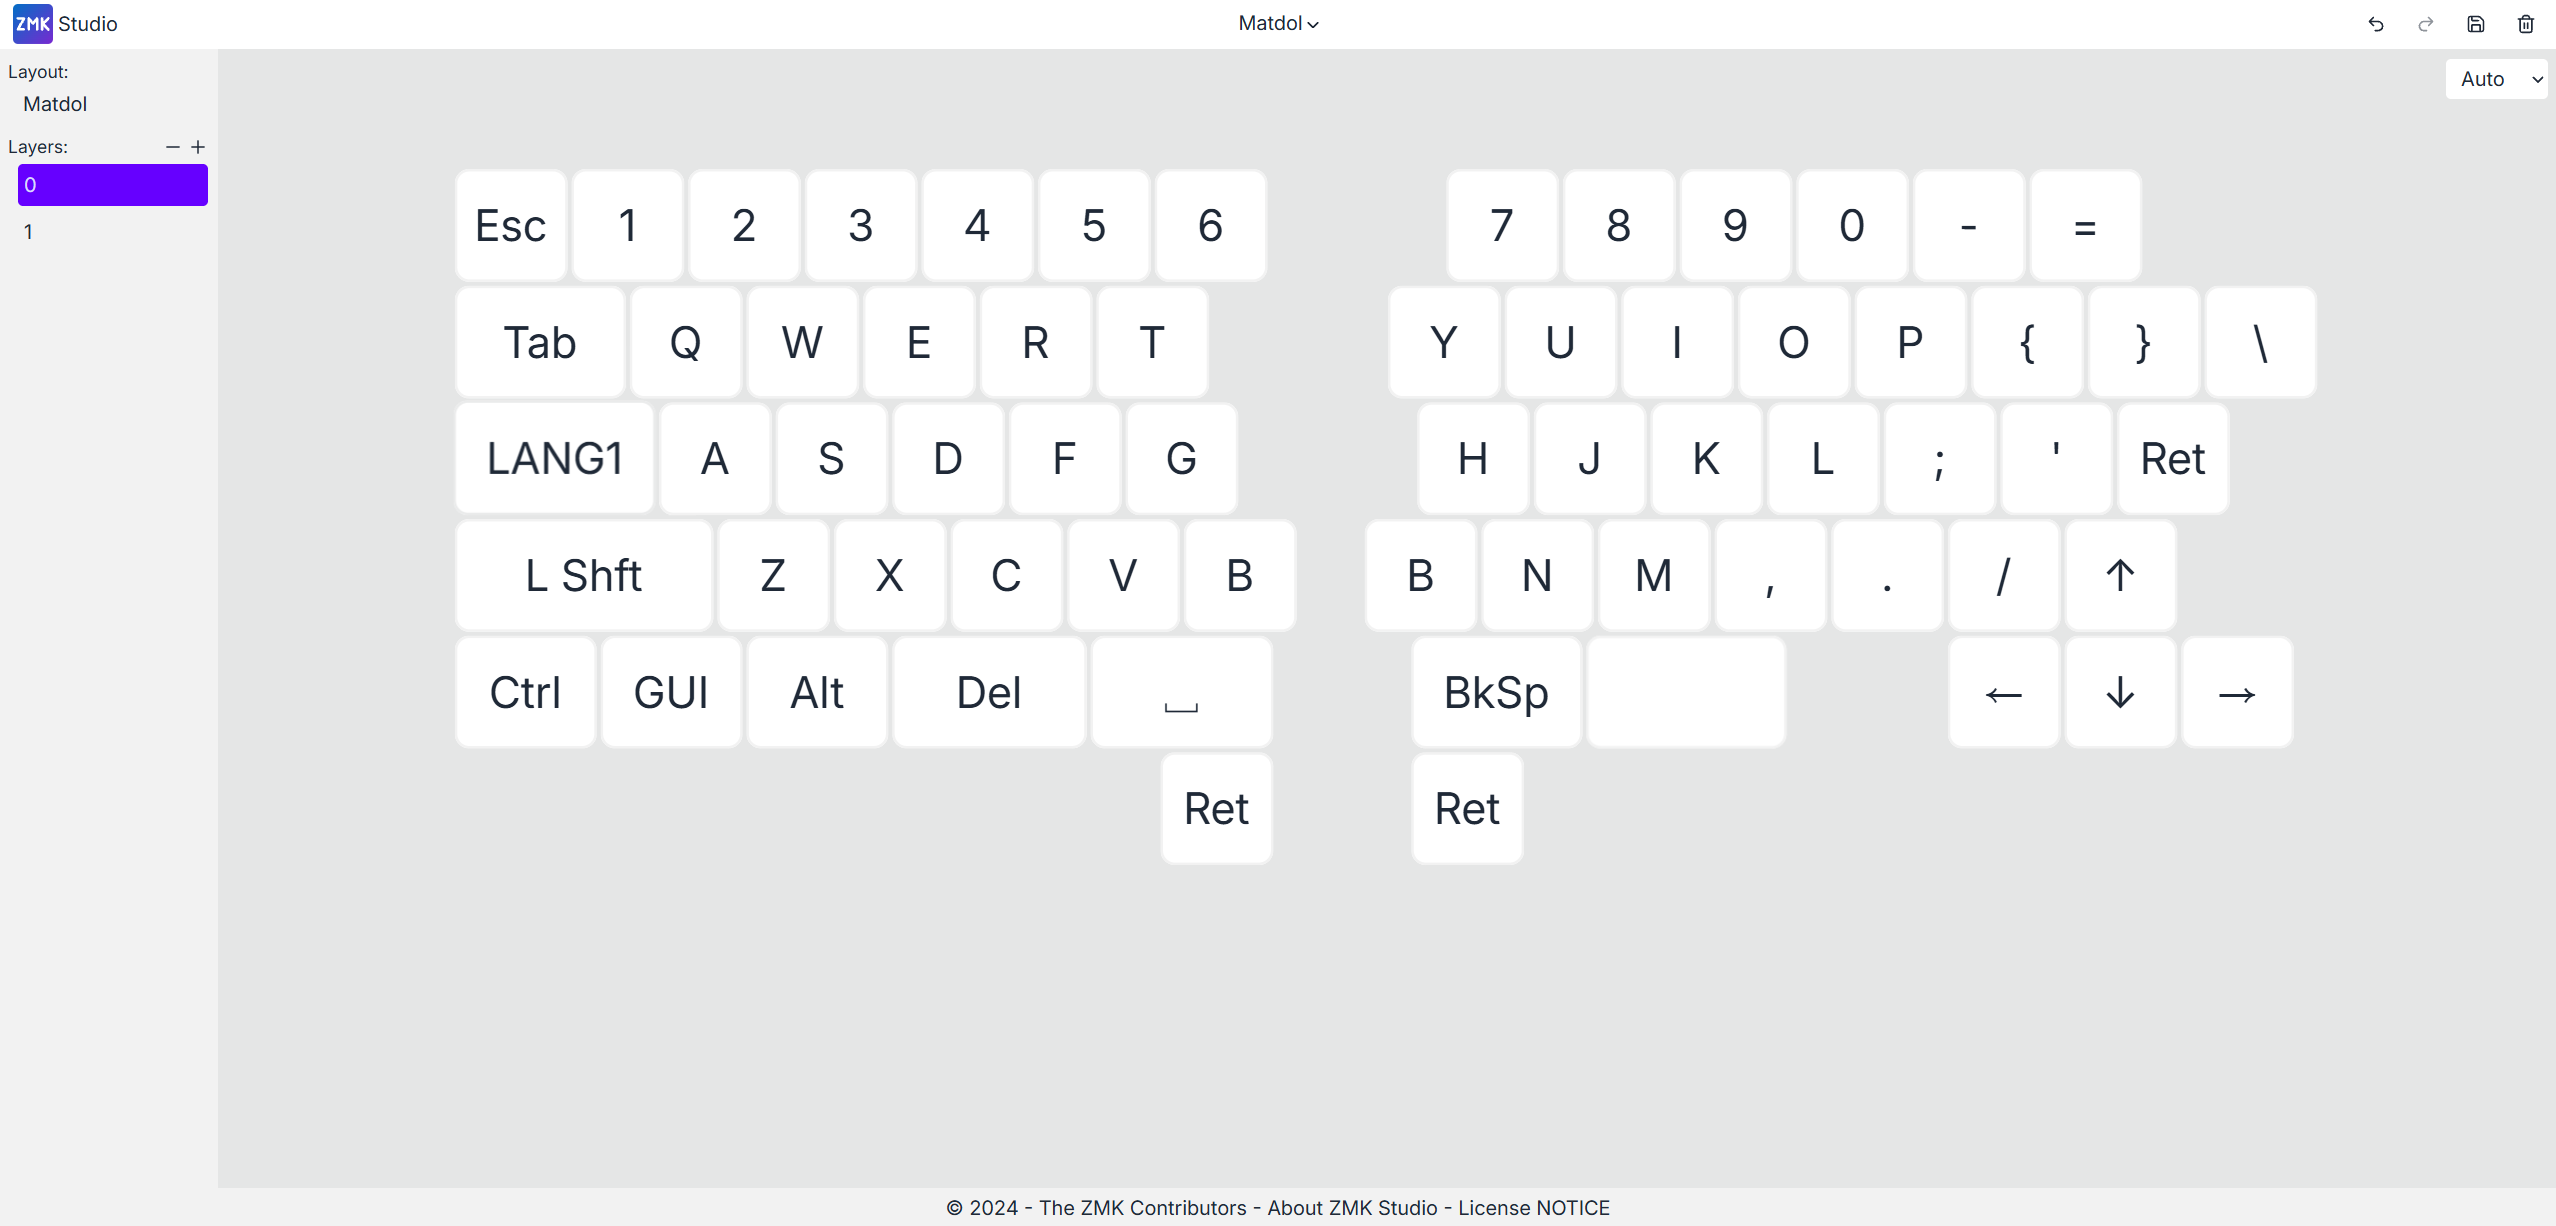
V2는 V1에서 검증한 기본 레이아웃을 유지했다. 왼쪽 31키, 오른쪽 34키로 구성된 총 65키 레이아웃이다. 오른쪽 본체에는 한글 ㅠ를 입력하기 위한 별도의 키가 있으며, Backspace는 손을 크게 움직이지 않고 누를 수 있도록 안쪽 상단에 배치했다.
V1에 있던 LCD는 제거했다. 실제 사용 과정에서 필요성이 낮았고, 화면을 위한 빈 공간 때문에 오른쪽 본체의 외형이 불필요하게 커졌기 때문이다. 팜레스트 역시 손바닥이 실제로 닿는 범위만 남기도록 면적을 줄였다. 불필요한 공간을 덜어내면서 V1보다 전체 실루엣이 간결해졌다.
키맵은 ZMK Studio를 통해 수정할 수 있다.
가스켓 구조와 외형
V1의 목표는 키보드가 동작하는 것이었기 때문에, 타건감과 케이스 외형은 상대적으로 우선순위가 낮았다. V2에서는 스플릿 키보드에서도 일반 커스텀 키보드와 비슷한 타건 경험을 만들고 싶었다.
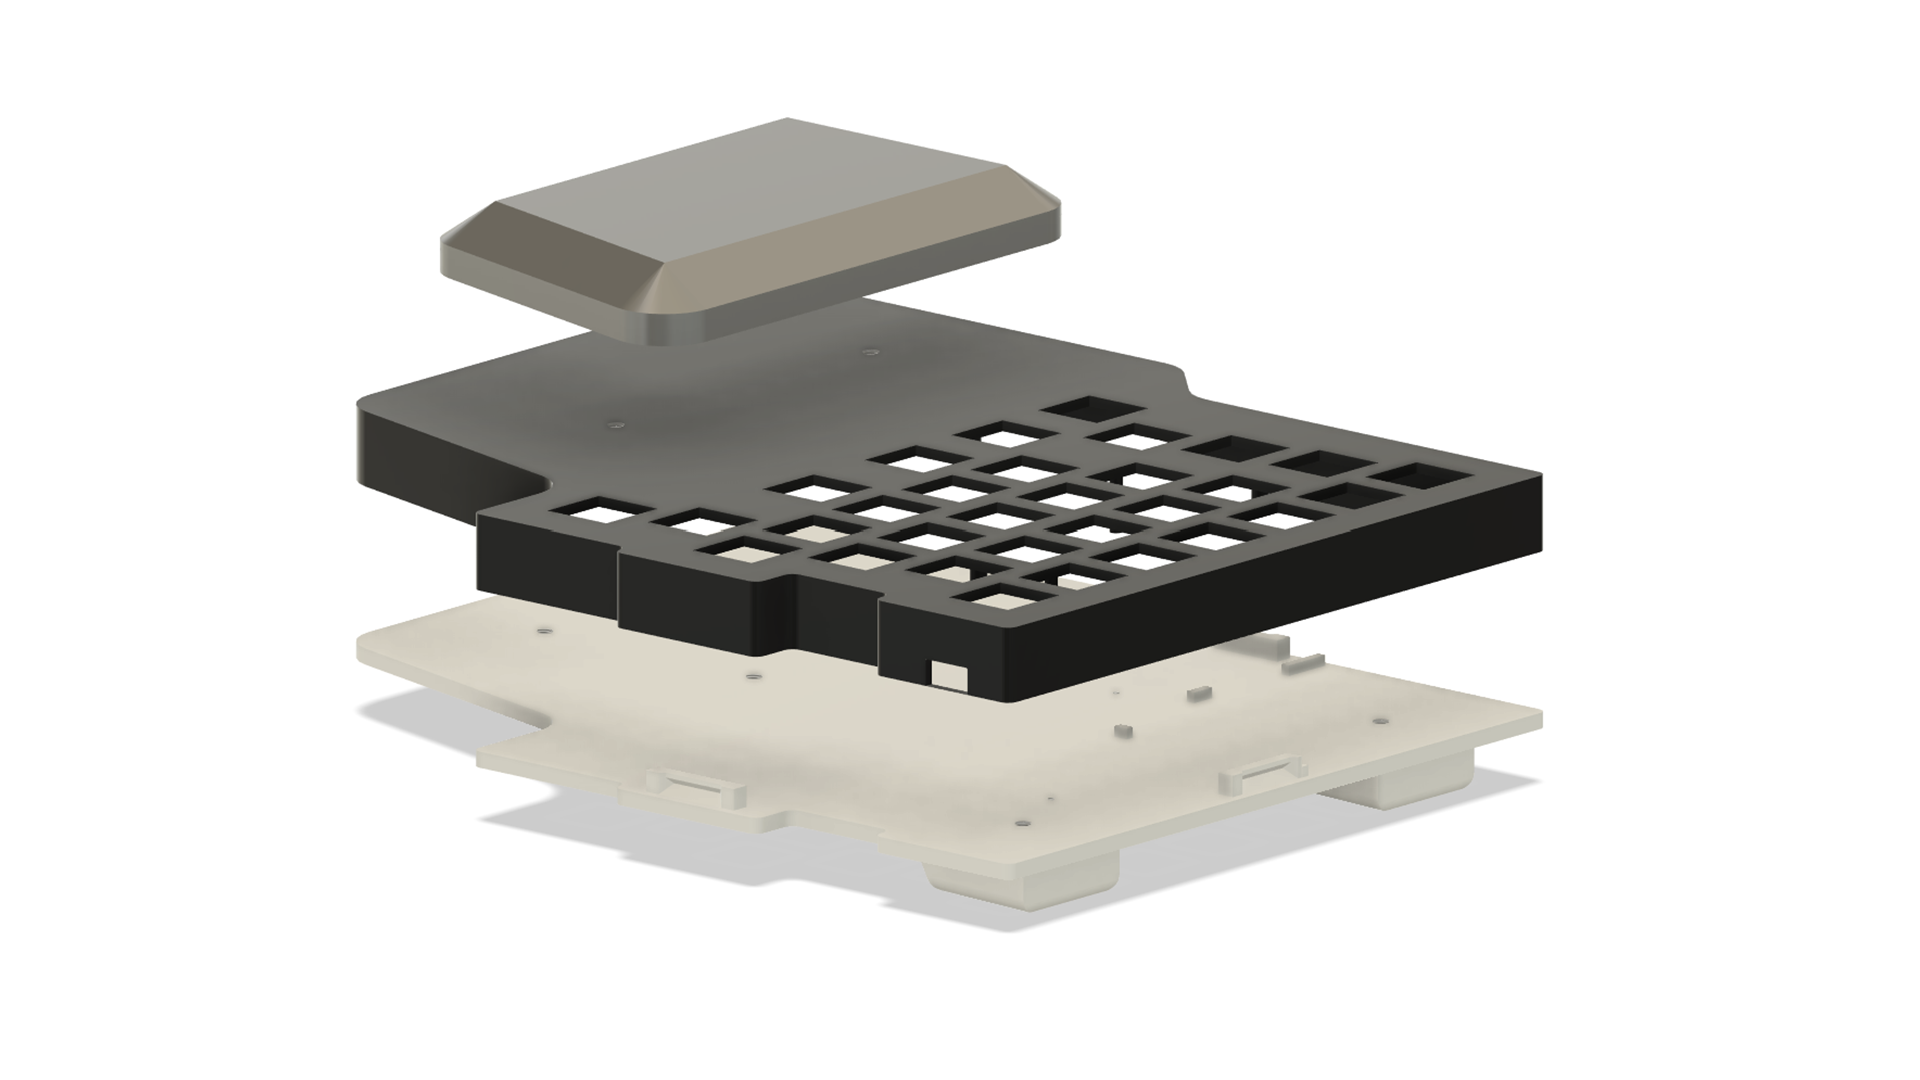
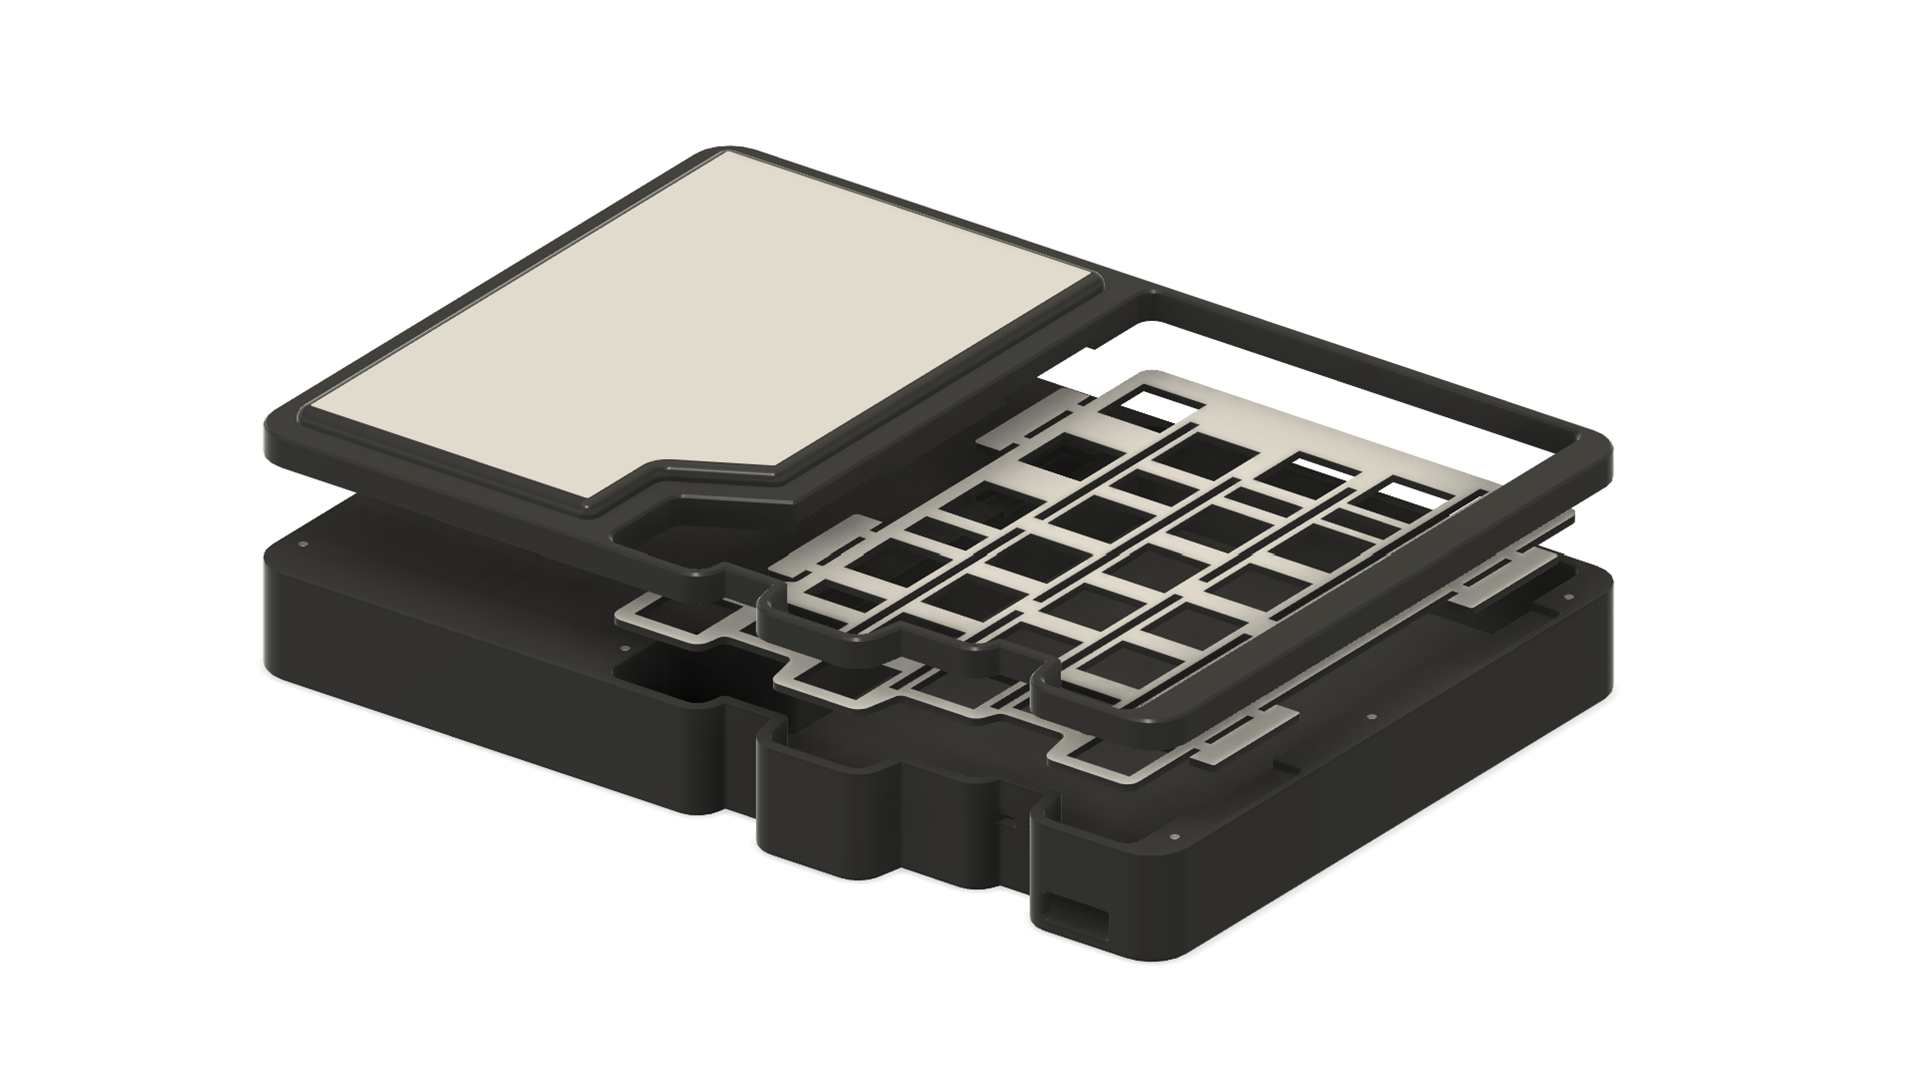
상판과 하판 사이에 실리콘 가스켓을 배치하고, 가스켓이 플레이트를 지지하도록 구조를 변경했다. 키를 누를 때 플레이트가 단단한 케이스에 직접 부딪히지 않기 때문에 V1보다 충격이 부드럽게 전달된다.
또한 V1에서는 플레이트가 상판 역할을 같이 했지만, V2에서는 상판을 따로 만들어 플레이트 가장자리를 덮도록 했다. 그 결과 플레이트와 케이스의 경계가 정리되고 디자인도 개선되었다.
팜레스트는 TPU 출력 환경을 다시 조정해 제작했다. V1보다 출력 품질과 탄성이 안정돼 실제로 손을 올려놓고 사용할 수 있는 수준이 됐다.
이번 V2 빌드의 구성과 타건감
Matdol의 기본 설계와 별개로, 현재 사용 중인 V2 빌드는 다음 부품으로 구성했다.
- 키캡: Cerakey Matte Black 세라믹 키캡
- 스위치: 40g급 리니어 스위치
- 마운트: 실리콘 가스켓 마운트
- 흡음재: 포론 흡음재
- 케이스: 3D 프린팅
- 팜레스트: TPU 3D 프린팅
세라믹 키캡은 일반 플라스틱 키캡보다 무겁고 단단하다. 여기에 가벼운 리니어 스위치와 가스켓 구조를 함께 사용하면서, 키압은 부드럽지만 소리는 낮고 묵직하게 만들 수 있었다. 세라믹 특유의 맑고 단단한 고음이 섞여 있어 주변에서는 요즘 유행하는 Wax Cracking ASMR과 비슷하다는 반응도 있었다.
다만 이 타건음은 Matdol의 케이스 구조뿐 아니라 세라믹 키캡과 스위치, 흡음재 조합에서 나온 결과다. 다른 키캡과 스위치를 사용하면 타건감과 소리도 달라질 수 있다.
실제 사용 결과
V1과 V2의 주관적인 자체 평가
V1과 V2를 실제로 사용한 경험을 기준으로 평가하면 다음과 같다.
| 항목 | V1 | V2 |
|---|---|---|
| 타건감 | ★☆☆☆☆ | ★★★★★ |
| 타건음 | ★★☆☆☆ | ★★★★★ |
| 기구적 안정성 | ★☆☆☆☆ | ★★☆☆☆ |
| 외관 완성도 | ★★☆☆☆ | ★★★☆☆ |
타건감과 타건음은 처음 목표했던 수준에 상당히 가까워졌다. 반면 기구적 안정성과 외관 완성도는 아직 개선할 부분이 많다.
아직 남아 있는 문제
V2를 계속 사용하면서 다음 문제를 발견했다.
- 텐팅 다리가 반복적으로 떨어진다.
- 내부에서 배터리가 움직이는 느낌이 있다.
- 키캡 사이로 흰색 플레이트와 쿠션 폼이 눈에 띈다.
- 상판과 하판 사이의 분할선이 쉽게 식별된다.
- 별도의 전원 스위치가 없다.
- 키보드 중앙부를 강하게 누르면 일부 스위치가 플레이트에서 빠진다.
V1에서 확인했던 핵심 문제는 상당 부분 개선했지만, V2를 실제로 오래 사용하면서 새로운 기구적 문제들이 드러났다. 이 문제들은 다음 버전에서 가장 먼저 해결해야 할 항목이다.
V2를 만들며 배운 점
V1과 V2를 만들면서 하나의 제품을 완성하기 위해 고려해야 하는 요소가 생각보다 훨씬 많다는 것을 알게 됐다. V1에서는 PCB가 정상적으로 동작하고 키 입력과 무선 통신이 되는지가 가장 중요했다. 하지만 실제로 오래 사용하는 제품을 만들려면 수리성, 조립 순서, 부품의 공차, 반복 체결 내구성과 같은 요소도 그만큼 중요했다.
USB-C 커넥터 앞쪽 케이스 벽의 두께처럼 사소해 보이는 치수도 실제 케이블을 연결할 수 있는지를 결정했다. CAD 화면에서는 별문제가 없어 보였던 구조도 출력하고 조립하는 순간 간섭이나 유격, 변형으로 나타났다.
재미있는 점은 V2가 V1보다 훨씬 복잡한 구조였음에도 개발 과정은 더 수월했다는 것이다. 한 번 제품을 만들어보고 실패한 뒤에는 어떤 문제를 먼저 확인해야 하는지, 어느 부분에 조립 여유가 필요한지, 어떤 부품이 고장날 수 있는지가 조금씩 보이기 시작했다.
아직 Matdol V2는 집에 있는 3D 프린터로 만든 개인 프로젝트에 가깝다. 다음에는 더 정교한 제조 공정과 반복 가능한 조립 구조를 적용해, 실제 판매 제품에 가까운 수준으로 발전시켜 보고 싶다.
그래서 지금도 사용하고 있는가
남아 있는 문제가 있음에도 레이아웃과 타건감, 타건음만큼은 이전에 사용하던 스플릿 키보드보다 만족스럽다. 현재는 Matdol만 사용하고 싶어져 집과 회사 사이에 키보드를 들고 다니고 있고, 손목 통증도 거의 느껴지지 않는다.
이제는 단순히 손목을 편하게 해주는 입력 장치를 넘어, 일반적인 커스텀 키보드에서 느낄 수 있는 묵직한 타건감을 스플릿 키보드에서도 즐길 수 있게 됐다.
그러다 다시 처음과 같은 문제가 생겼다.
이 키보드가 한 대 더 필요하다.
다음 목표 — 같은 품질로 5대 만들기
V1에서는 한 대의 키보드를 직접 만드는 방법을 배웠고, V2에서는 내가 매일 사용하고 싶은 한 대를 만들었다. 다음 단계에서는 V2에서 발견한 기구적 문제를 개선하고, 같은 품질로 5대를 반복 제작할 수 있는지 검증하려 한다.
한 대를 잘 만드는 것과 동일한 품질의 다섯 대를 만드는 것은 다른 문제다. 부품마다 다른 공차를 어떻게 흡수할지, 조립자가 달라도 같은 결과가 나올지, 불량 여부를 어떤 기준으로 검사할지까지 고려해야 한다.
우선 다음 항목을 검토하고 있다.
- 제조 공정 — FDM 대신 MJF 또는 SLS를 사용할 것인가
- 판매 형태 — 키트와 완제품 중 어떤 형태로 제공할 것인가
- 기구 개선 — 텐팅 다리와 배터리 고정을 반복 조립이 가능한 구조로 바꾸는 방법
- 품질 기준 — 다섯 대의 편차를 확인할 QC 기준과 교체 부품 제공 방식
소량 제작 경험이 있는 사람에게는 키보드 케이스 제작에 MJF와 SLS 중 어떤 공정이 더 적합했는지 듣고 싶다. Matdol에 관심이 있는 사람에게는 키트와 완제품 중 어떤 형태를 선호하는지도 궁금하다. 관련 경험이나 의견이 있다면 이메일이나 X로 편하게 연락해 주길 바란다.
Matdol is a DIY split-keyboard project for which I designed the PCB, firmware, and enclosure entirely on my own. I started it because I wanted to keep the wrist-friendly benefits of a split layout while improving the key placement, repairability, and typing feel I found lacking in the split keyboard I had been using.
The current V2 build uses ceramic keycaps, 40 g linear switches, a gasket mount, and Poron foam. I aimed for a deep, weighty thock complemented by the crisp, hard crack unique to ceramic keycaps.
This post covers how the failures of my first prototype shaped Matdol V2, and what I plan to validate in the next stage: a five-unit pilot run.
Matdol V2 at a Glance
| Category | Details |
|---|---|
| Layout | Asymmetric 65-key split layout: 31 keys on the left and 34 on the right |
| Key features | Dedicated right-hand ㅠ key, Backspace near the center, detachable palm rests |
| Firmware | ZMK-based, with keymap editing through ZMK Studio |
| Controller | Socketed, replaceable controller module |
| Status and updates | Externally accessible firmware-update button and status LED |
| Mount | Gasket mount with silicone pads supporting the plate |
| Case | Two-piece 3D-printed top and bottom shell |
| Current build | Cerakey Matte Black keycaps, 40 g linear switches, Poron foam |
| Palm rests | 3D-printed in TPU |
How Matdol Came to Be
The Wrist Pain That Started It All
After spending long hours at a keyboard for work, I began to feel pain in my right wrist. In my case, reaching for Backspace forced my right hand to bend sharply outward, and repeating that movement seemed to make the pain worse.
While looking for a keyboard that would let me move my wrist less, I discovered split keyboards. Because the two halves are separated, I could place my shoulders and wrists at a more natural angle. Split keyboards also tend to have more thumb keys, which meant I could move Backspace somewhere within easy reach.
Once I switched to a split keyboard, I no longer had to move my right hand so far just to press Backspace. I thought I had solved both my wrist problem and my quality-of-life problem.
One Split Keyboard = One HHKB + One Rainy75 🤯
To me, my first split keyboard felt less like a keyboard and more like a wrist-saving device. Framed that way, paying $350 for it seemed entirely reasonable.
But a new problem appeared almost immediately.
Should I use this keyboard at home or at the office?
I spend long hours at a computer in both places. To get the full benefit of a split keyboard, I needed one at each desk. I tried carrying it back and forth for a while, but packing both halves, the cables, and the palm rests every day quickly became a nuisance. Buying a second one seemed like the obvious answer, but paying for two identical keyboards was hard to justify.
Problems Money Could Not Solve
Price was not the only reason I decided to build my own keyboard. Even if I paid for another split keyboard, I could not find one that satisfied both the layout and typing feel I wanted.
B and ㅠ Share a Key, but I Use Different Hands
When typing in English, I press B with my left hand. When typing in Korean, however, I press the vowel ㅠ—which shares the same physical key on a standard Korean layout—with my right hand.
On a conventional keyboard, both hands can reach that same key, so this is not a problem. On a fully split keyboard, however, the B/ㅠ key exists only on the left half. English input felt normal, but whenever I typed in Korean, my right hand kept reaching for a key that was no longer there.
That is why Matdol has one extra key on its right half. I added a dedicated ㅠ key to the left of N, allowing me to preserve the hand movements I had already learned for both English and Korean. (The blue B is used for English input, while the amber B is used for Korean input.)
It Felt More Like a Therapy Device Than a Custom Keyboard
Many of the split keyboards I looked at prioritized portability, a thin profile, and low weight. They were excellent ergonomic input devices, but they were far from my preference for a substantial feel and a deep, low-pitched sound.
With a typical custom keyboard, pressing the keys is part of the pleasure. The split keyboard I was using at the time felt more like a tool for protecting my wrist. I wanted a split keyboard that could also deliver the satisfying weight and sound of a custom keyboard.
In the end, building one myself seemed like the only reliable way to solve the price, layout, and typing-feel problems at the same time.
Prototype V1 — At Least It Worked
That is how I started building my first split keyboard. V1 was a prototype intended to validate three things:
- Whether a dedicated right-hand
ㅠkey would actually be useful - Whether moving Backspace closer to the center would reduce wrist movement
- Whether a self-designed PCB and ZMK firmware could support everyday work
I added the dedicated ㅠ key to the left of N on the right half, and placed Backspace near the inner top edge so I could press it without bending my right wrist outward.
The case and tenting parts were all 3D-printed. I had already been using tenting on the right half of my previous split keyboard, so I applied a similar angle to V1. I also tried making palm rests from TPU, but my TPU printing setup was not reliable at the time, and the surface quality and elasticity were both disappointing.
I placed a small LCD in the upper-right corner as well. The original plan was to show information such as battery level and connection status, but I eventually decided that the display was not useful enough to keep.
I handled the entire process myself, from PCB design and ZMK firmware development to 3D modeling the case. Every part of the project was new to me, so I had to learn each discipline as I went. Because I could only work on it after my day job, V1 took about a year to complete.
V1 successfully validated the layout and electronics. The right-hand ㅠ key and the new Backspace position were genuinely useful, and I could use the keyboard for everyday work.
The problem was everything around them.
Why I Stopped Using It After Three Months
I used V1 for about three months. Then, one day, the controller module failed. In principle, I should have been able to replace only the failed module, but V1 had not been designed with repairability in mind. Replacing the controller meant disassembling most of the case and internal wiring—almost as much work as rebuilding the keyboard from scratch. In the end, V1 went into storage unrepaired.
About two years after completing V1, I was back to using a conventional tenkeyless keyboard at home. Then I came across V1 sitting in storage. By that point, I had gained more experience with PCB design, 3D modeling, and 3D printing. Unlike the first time, I now had at least some idea of what I was doing.
This time, I decided not to build a keyboard that merely worked. I wanted something closer to a real product: a keyboard I could use every day, repair when it failed, and repeatedly disassemble and reassemble.
If V1 asked, “Does the keyboard work?”, V2 asked, “Do I actually want to keep using it?”
V2 — Matdol
V2 Design Goals
Based on the problems I found while using V1, I set the following goals for V2:
- Failed parts should be easy to replace
- The keyboard should tolerate repeated disassembly and reassembly
- Firmware should be updateable without opening the case
- Connection and operating status should be visible from the outside
- It should combine the ergonomic benefits of a split keyboard with the typing feel of a custom keyboard
- It should look more like a finished product than V1
A Replaceable Controller Module
The immediate reason I stopped using V1 was the controller failure. The bigger problem, however, was that replacing it was so difficult.
In V2, the controller module is mounted in pin-header sockets instead of being fixed directly to the PCB. If the controller fails, I can now remove the old module and install a new one without replacing or resoldering the entire PCB.
It took an actual failure in V1 for me to understand that repairability is not merely a convenience feature. It is a core requirement for keeping a product usable over time.
A Case Designed for Repeated Disassembly
V1’s top and bottom shells were joined with a combination of snap-fits and screws. FDM printing variation and repeated disassembly made the fit inconsistent: some sections became loose, while others would not close completely. Opening the case also required flexing the bottom shell significantly, which caused deformation over time.
For V2, I removed the snap-fits and changed every joint to a screw-fastened design. I distributed the screws so the top and bottom shells would be clamped more evenly, reducing the amount of localized deformation during repeated disassembly and reassembly.
The structure is still not perfect. The seam between the top and bottom shells remains visible. Even so, the risk of damaging the case during service—or suddenly losing retention as the snap-fits wear—has been greatly reduced.
Updating Firmware Without Opening the Case
On V1, updating the firmware required removing the bottom shell and pressing a button on the controller module directly. Having to open the case every time I changed a keymap or feature was inconvenient during development and unsuitable for long-term maintenance.
In V2, I routed the firmware-update pins to an externally accessible button, allowing the keyboard to enter firmware-update mode without opening the bottom shell. I also added a status LED to show the Bluetooth connection and operating state.
These were small changes, but they made both everyday use and development much more convenient.
An Asymmetric 65-Key Layout
V2 retains the basic layout validated in V1. It has 65 keys in total: 31 on the left and 34 on the right. The right half includes a dedicated key for the Korean vowel ㅠ, while Backspace sits near the inner top edge so it can be pressed without a large hand movement.
I removed the LCD from V1. It had little practical value, and the empty space reserved for it made the right half unnecessarily large. I also reduced the palm-rest footprint to only the area that actually supports the hand. Removing that unused space gave V2 a cleaner overall silhouette.
The keymap can be edited through ZMK Studio.
Gasket Structure and Exterior Design
Because V1’s main goal was simply to work, typing feel and exterior design were relatively low priorities. With V2, I wanted a split keyboard that felt closer to a conventional custom keyboard.
I placed silicone gasket pads between the top and bottom shells so they could support the plate. Because the plate no longer strikes the hard case directly, keystroke impact feels softer than it did on V1.
On V1, the plate edge was fully exposed. On V2, the top shell overlaps and hides the perimeter of the plate. This cleans up the boundary between the plate and the enclosure, making the assembly look more like a single product than a stack of separate parts.
I also retuned my TPU printing setup for the palm rests. Compared with V1, the surface quality and elasticity are now stable enough for regular use.
Current V2 Build and Typing Feel
Separate from Matdol’s base design, the V2 unit I currently use is built with the following parts:
- Keycaps: Cerakey Matte Black ceramic keycaps
- Switches: 40 g linear switches
- Mount: Silicone gasket mount
- Dampening material: Poron foam
- Case: 3D-printed
- Palm rests: 3D-printed in TPU
Ceramic keycaps are heavier and harder than conventional plastic keycaps. Combined with light linear switches and the gasket mount, they produce a light actuation feel with a deep, weighty sound. The ceramic keycaps also add a clear, hard high-frequency edge, and some people around me have compared the result to wax-cracking ASMR videos.
That said, this sound is not produced by the Matdol enclosure alone. It is the result of the complete combination of ceramic keycaps, switches, and dampening material. Different keycaps and switches will naturally change both the feel and the sound.
Real-World Use
A Subjective V1 vs. V2 Comparison
Based on my own experience using both versions, I would rate them as follows:
| Category | V1 | V2 |
|---|---|---|
| Typing feel | ★☆☆☆☆ | ★★★★★ |
| Typing sound | ★★☆☆☆ | ★★★★★ |
| Mechanical stability | ★☆☆☆☆ | ★★☆☆☆ |
| Visual refinement | ★★☆☆☆ | ★★★☆☆ |
The typing feel and sound are now quite close to what I originally wanted. Mechanical stability and visual refinement, however, still leave plenty of room for improvement.
Problems That Still Remain
Continued use of V2 revealed several issues:
- The tenting legs come loose repeatedly
- The battery can move inside the case
- The white plate and cushion foam are visible between the keycaps
- The seam between the top and bottom shells is easy to notice
- There is no dedicated power switch
- Pressing firmly near the center of the keyboard can cause some switches to pop out of the plate
V2 resolves many of the core problems I identified in V1, but long-term use has exposed a new set of mechanical issues. These will be the first items I address in the next version.
What I Learned Building V2
Building V1 and V2 taught me just how many factors have to be considered before a device can feel like a finished product. In V1, my main priorities were making sure the PCB worked and that key input and wireless communication were reliable. But a product intended for long-term use also needs repairability, a sensible assembly sequence, controlled tolerances, and joints that can survive repeated service.
Even something as small as the thickness of the case wall in front of a USB-C port can determine whether a cable can actually be plugged in. Structures that looked fine in CAD revealed interference, looseness, and deformation the moment they were printed and assembled.
What I found interesting was that V2 was far more complex than V1, yet the development process was smoother. Once I had built—and failed with—one product, I began to see which problems needed to be checked first, where assembly clearance was necessary, and which parts were likely to fail.
Matdol V2 is still closer to a personal project made on a home 3D printer than a commercial product. In the next stage, I want to apply more precise manufacturing processes and a repeatable assembly structure to bring it closer to something that could actually be sold.
So, Do I Still Use It?
Despite the remaining issues, I am more satisfied with Matdol’s layout, typing feel, and sound than I was with the split keyboard I used before. It has become the only keyboard I really want to use, so I now carry it back and forth between home and the office. I also barely notice the wrist pain anymore.
It has gone beyond being a wrist-friendly input device. I can now enjoy the deep, substantial typing feel I associate with custom keyboards in a split form factor.
Then I ran into the same problem all over again.
I need another one.
Next Goal — Build Five to the Same Standard
V1 taught me how to build a single keyboard, and V2 gave me one I genuinely wanted to use every day. The next step is to fix the mechanical issues found in V2 and determine whether I can build five units to the same standard.
Building one good unit and building five consistently good units are different problems. I now have to consider how to absorb part-to-part tolerance variation, whether different assemblers can achieve the same result, and how to define pass/fail criteria for quality control.
The main questions I am currently evaluating are:
- Manufacturing process — Should I use MJF or SLS instead of FDM?
- Product format — Should Matdol be offered as a kit or as a fully assembled keyboard?
- Mechanical improvements — How should I redesign the tenting legs and battery retention for reliable repeated assembly?
- Quality criteria — What QC checks should I use to measure variation across five units, and how should replacement parts be provided?
I would especially like to hear from people with small-batch manufacturing experience about whether MJF or SLS is better suited to a keyboard enclosure. I would also like to know whether people interested in Matdol would prefer a kit or a fully assembled keyboard. If you would like to share your experience or feedback, please reach out by email or on X.